
A shaft full of water is not necessarily a working bubble elevator. The upward column needs Soul Sand below an uninterrupted stack of water source blocks. One flowing cell or a waterlogged decoration in the middle can stop the connection, even when the rest of the shaft looks full.
This guide builds a small, six-water-block elevator in the Overworld in Minecraft Java Edition. It has a dry lower entrance, a dry upper landing and a separate construction route. Get this short version working before extending the design into a tall tower or a deep mine.
Prepare access before adding water
Choose somewhere with room for an enclosed one-block-wide shaft and a landing beside it. Keep stairs, a ladder or scaffolding available outside the shaft so you can reach the top and make repairs without depending on the unfinished elevator.
You need building blocks, water buckets, three wall signs and one Soul Sand block. If you use the kelp method, also bring a temporary dirt base and enough kelp to fill all six water positions. Ordinary glass is useful for seeing the column, but it is not a requirement.
Use Soul Sand, not Soul Soil. They look related, but Soul Soil does not create the upward bubbles. For now, leave dirt at the bottom; activate the column only after its water and exits are ready.
Do not remove your outside access after the first successful trip upward. You still need to confirm that you can leave at the top and reach the base again without dismantling the shaft.
Build the six-cell shaft and two landings
The diagram numbers the water positions from 1 at the bottom to 6 at the top. The base underneath them is level 0; it is not a seventh water cell. These are local building labels, not world-coordinate heights.
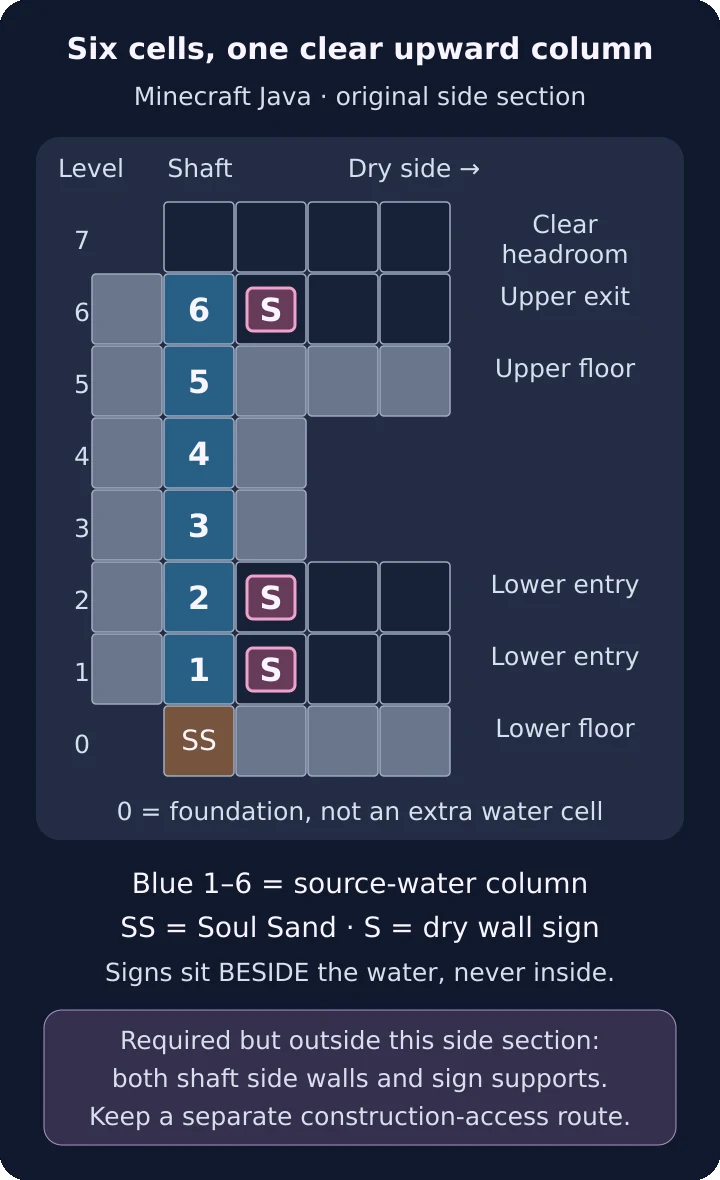
Original side-section plan: six water cells above Soul Sand, with dry entrance signs beside the shaft. Side walls and sign-support blocks extend out of the drawing; keep external access during construction.
Enclose the back and both sides of the shaft at all six water levels. The front faces your entrances. Its middle three positions, levels 3, 4 and 5, are solid blocks. The remaining front positions are occupied by dry wall signs: two at the lower entrance and one at the upper exit.
Crucially, those signs are beside the water column, not inside it. Each sign attaches to a side block in its doorway. The shaft itself must remain a clear vertical line of six water cells.
| Part | Placement | Purpose |
|---|---|---|
| Lower landing | Floor beside the base at level 0 | Lets you walk into the bottom of the shaft |
| Lower doorway | Signs beside water cells 1 and 2 | Retains water across a two-block-high entrance |
| Upper landing | Floor beside water cell 5 | Supports you when you leave the shaft at level 6 |
| Upper doorway | Sign beside water cell 6, clear air above it | Keeps the landing dry while leaving headroom |
| Shaft top | Air above water cell 6 | Avoids sealing the arrival point under a low ceiling |
Place the wall signs while their doorway cells are dry. Do not pour water into the signs. Water belongs in the adjacent shaft; the signs form its boundary while allowing you to move through the entrance.
At the top, continue the floor outward into a usable landing rather than leaving a single ledge. Leave the walking space and headroom clear, and add an edge barrier where needed without blocking the route to your external stairs or ladder. The side walls and the blocks supporting the signs still matter even though a side-view drawing cannot show all of them at once.
Method one: make each cell a source directly
The straightforward method is to fill each of the six shaft cells with a bucket placement. One bucket poured at the very top produces a falling stream; it does not make all six cells into source blocks.
Work from your outside access. If necessary, open a temporary service gap beside the cell you need to fill, place the water into that shaft position, and restore the wall before continuing. Keep the two finished doorways intact. Refill your bucket from an accessible water supply rather than trapping yourself inside the build to reach the next position.
A simple record prevents a half-finished column: mark cells 1 through 6 as you fill them. Seeing water at a position is not the same as remembering that you supplied its source. Once all six are filled and the enclosure is restored, proceed to activation.
This method takes repeated placements, but it makes the requirement clear. It is also useful when repairing one known gap: you do not have to replace every good water cell just because one position is wrong.
Method two: convert a falling stream with kelp
Kelp can occupy downward-flowing water and turn it into source water. For this method, keep the dirt base, pour water into the top shaft cell and allow it to fill the shaft downward.
Place kelp on the dirt, then continue the kelp stack manually through every numbered position, including cell 6. Do not stop at cell 5 because the last piece looks close to the surface. Do not wait for random growth when you can place the complete stack yourself.
Use your outside route and service openings as needed while placing it. If you enter the water to work, return to the dry entrance before your air runs out; the unfinished stream is not yet a functioning bubble column. Repair any service opening before the final conversion is complete.
Now remove the kelp. Breaking its lowest piece also breaks the kelp above it. Collect the drops and make sure no plant remains in the shaft. The goal is six source-water cells, not a permanent six-block plant inside the elevator.
Only then remove the temporary dirt and put Soul Sand in the base position. This order avoids trying to build the kelp stack through an already active upward column.
Mojang's explanation of kelp and source water
Read the referenceActivate the column and test both ends
Enter from the lower landing and check that the upward movement continues through the shaft. At the top, move sideways through the upper doorway onto its floor. Use the external route to return to the base for another inspection.
Test the exit as part of the build, not as an afterthought. Reaching the top of the water does not help if a block fills the headroom or the landing is missing. If movement works but the upper doorway is awkward, repair the doorway and platform rather than changing the Soul Sand or rebuilding the water unnecessarily.
When bubbles stop at cell 4
Consider a partly working column: cells 1, 2 and 3 bubble, cell 4 contains flowing water, and cells 5 and 6 are sources. The upper sources do not skip over the broken connection. Repair cell 4 so the upward column can continue through it.
| Cell | Before repair | After repairing cell 4 |
|---|---|---|
| 6 | Source above the interruption | Connected to the upward column |
| 5 | Source above the interruption | Connected to the upward column |
| 4 | Flowing water interrupts the path | Source reconnects the path |
| 3–1 | Working lower section | Working lower section |
Start at the first position above the working bubbles. This is more useful than repeatedly replacing a correctly placed base. If the lower section already works, you have evidence that the problem is farther up the path.
A waterlogged sign or another waterlogged block inside the shaft is a different kind of interruption. Adding water does not remove the physical block. Remove the obstruction from the vertical path, restore that position as a source and keep decorations outside the column.
Diagnose the symptom before rebuilding
| Symptom | Inspect first | Targeted repair |
|---|---|---|
| No upward bubbles at the bottom | Base block and the water immediately above it | Replace Soul Soil or dirt with Soul Sand; restore the first source |
| Only the lower section works | First non-bubbling cell above it | Correct flowing water or remove an obstruction there |
| Water reaches a landing | The doorway boundary | Restore the dry sign arrangement beside the shaft |
| You rise but cannot leave comfortably | Upper floor, doorway and headroom | Clear the exit and complete the landing |
After a repair, repeat the trip from the lower entrance through the upper exit. Keep the outside route until the full journey works. If you later extend the shaft, treat every added level as another required source cell and rebuild the upper landing at its new height; a longer falling stream alone is not the extension you need.
Latest comments
Log in to join the conversation
Log InNo comments yet. Be the first to share your thoughts!