
Before tuning an expensive Drive Disc, decide which of your six positions it will occupy and which set count it will change. A good disc can still be the wrong craft if it replaces an already useful piece while leaving your intended four-piece bonus unfinished.
The most efficient next target is often not the position with the most desirable-looking stats. It is the position where one replacement solves the actual problem: the missing set piece, an unsuitable main stat, or a genuinely weak existing disc. Those are three different problems, and Calibrators and Resonating Cores do not solve them in the same way.
This guide assumes you have chosen a set combination that fits your Agent and have access to Advanced Tuning. It explains how to assemble that combination, not which set is currently best for every character.
Six numbered positions, not six interchangeable discs
A disc belongs to a particular partition. You cannot take a Partition 5 disc and equip it in Partition 3 just because you need its set there. The equipment layout runs down the left side and back up the right:
| Row | Left side | Right side |
|---|---|---|
| Top | Partition 1 | Partition 6 |
| Middle | Partition 2 | Partition 5 |
| Bottom | Partition 3 | Partition 4 |
Main-stat possibilities also depend on the partition. The first three have fixed main stats; the other three have pools of possible main stats.
| Partition | Main-stat possibilities |
|---|---|
| 1 | Flat HP |
| 2 | Flat ATK |
| 3 | Flat DEF |
| 4 | HP%, ATK%, DEF%, CRIT Rate, CRIT DMG or Anomaly Proficiency |
| 5 | HP%, ATK%, DEF%, PEN Ratio or Attribute DMG Bonus |
| 6 | HP%, ATK%, DEF%, Anomaly Mastery, Impact or Energy Regen |
That is why a main-stat Calibrator is useful for a selected stat in Partitions 4–6, but is not available for the already fixed main stats in 1–3. A Partition 3 disc can still have poor substats; it simply does not have a random main stat for a Calibrator to correct.
Count set effects before looking at individual rolls
Matching discs activate two-piece and four-piece effects. A 4+2 arrangement gives the main set’s two-piece and four-piece effects plus the other set’s two-piece effect. A 3+3 arrangement gives two two-piece effects, but neither four-piece effect. Six pieces of one set do not unlock a separate six-piece effect.
A 2+2+2 arrangement can also be intentional. Do not force 4+2 merely because the notation is familiar. The planning problem here begins once you have decided that a particular four-piece effect is part of your build.
Call that main set A and the complementary set B. Write A or B against each numbered position. Counting names in the inventory is not enough: the relevant count is the six discs the Agent will actually equip together.
Worked case: finish the set through a fixed-stat position
Suppose your current equipped layout is below. You want four A pieces and two B pieces, and your B discs in Partitions 5 and 6 already have the main stats you want.
| Partition | Current piece | Planned piece | Action |
|---|---|---|---|
| 1 | Set A | Set A | Keep. |
| 2 | Set A | Set A | Keep. |
| 3 | Set B, weakest current piece | Set A | Target a replacement here. |
| 4 | Set A | Set A | Keep. |
| 5 | Set B, useful main stat | Set B | Keep. |
| 6 | Set B, useful main stat | Set B | Keep. |
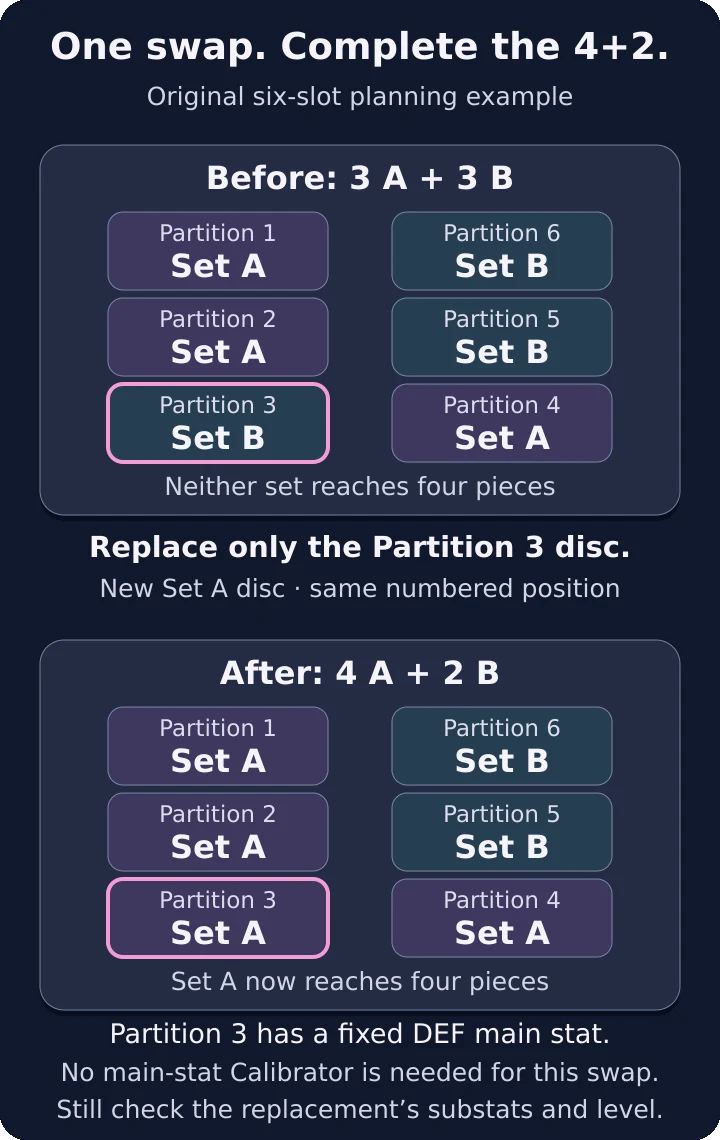
Original planning example: replace the weak B3 with a new A3 while keeping the other five equipped discs. Partition3 has a fixed flat DEF main stat, so this swap does not need a main-stat Calibrator. The replacement still needs suitable substats and development; it is not a free or guaranteed upgrade.
The current count is three A and three B. Replacing Partition 3 with A changes it to four A and two B. Because Partition 3 has a fixed DEF main stat, this route does not require a main-stat Calibrator. You still need to judge the replacement’s substats and level, but you have avoided introducing an extra main-stat requirement.
Now compare a different craft: an A disc for Partition 5. That could also complete four A pieces, but it would replace a B piece you already like and require the appropriate variable main stat. It is not automatically wrong—an excellent A5 might be an upgrade—but it is solving a more demanding replacement problem than the weak B3.
This is the first question to ask before spending a rare item: can the same set-count change be made in a less constrained position?
When your best pieces occupy all three variable-stat positions
Consider a second layout: A in Partitions 1, 2 and 3, with B in 4, 5 and 6. All three B pieces are useful. You still have only three A pieces.
There is no rearrangement that lets you keep all three B discs equipped and also equip four A discs: three plus four requires seven positions. Moving an existing disc to a different numbered partition is not an option either.
You have a real tradeoff. To reach four A pieces, replace at least one of those three B pieces with an A disc for the same partition. Compare the available A4, A5 and A6 replacements against the B piece each would displace. The correct target is the least costly acceptable swap, not automatically Partition 4 or the rarest-looking main stat.
For example, if you already own a usable A6 but have no suitable A4 or A5, equipping A6 may finish the set without any new tuning. If every available A replacement would undermine the build’s main-stat needs, keep the useful pieces while working toward a suitable replacement. An incomplete set can be a temporary state; spending a Calibrator on the wrong stat will not make the intended finished build work.
Do not dismantle the displaced B piece immediately. Another Agent or a later arrangement may still use it. “No longer equipped here” and “worthless to the account” are different conclusions.
Choose the tuning tool that fixes the missing condition
The Music Store lets you target a set. In Advanced Tuning, an ordinary random-partition disc uses 3 Hi-Fi Master Copies; selecting a partition uses 6. Main-stat selection adds one Tuning Calibrator for the disc. Resonating Cores separately select substats: one Core for one selected substat, or two Cores for two.
| Your actual problem | Relevant control | What it does not solve by itself |
|---|---|---|
| You need more candidates from a chosen set across several positions | Set selection with ordinary tuning | A particular partition or main stat. |
| Exactly one numbered position is missing | Partition selection | The random main stat in 4–6. |
| You need a particular main stat in 4–6 | A Tuning Calibrator with the selected partition | Desirable substats or their later enhancement results. |
| The set, partition and main-stat plan is settled, but you want specific substats | Resonating Cores | A wrong main-stat choice or a missing set-count plan. |
Tuning creates a new disc. Do not plan around applying a Calibrator to change the main stat of an existing equipped disc. Likewise, choosing substats for a new disc is not the same as directing every later enhancement into those stats.
A useful order is set, partition, main stat, then optional substats. Reversing that order makes it easy to spend resources on a disc with attractive substats that never belonged in the planned six-piece layout.
Ordinary tuning versus partition targeting
Suppose you have 12 Hi-Fi Master Copies. They fund four ordinary Advanced Tuning results, or two partition-selected results. Four results are more pieces, but they are not four attempts at your one missing partition.
If you have useful gaps across most of the six positions, ordinary tuning can provide candidates for several of them. If only Partition 3 is missing from the first worked example, partition targeting directs both results at the exact set-count repair you need. Neither choice guarantees good substats.
Do not turn this into a universal “always target” rule. The advantage depends on how many different outcomes could improve your current equipment. A nearly finished layout and a new Agent with several empty or weak positions are different uses of the same Master Copies.
A five-Calibrator budget: main-stat fixes or deeper targeting?
Resonating Cores can be crafted from Tuning Calibrators at a two-to-one ratio. That conversion competes with using Calibrators directly for main-stat selection.
Assume you have five Calibrators, no Cores, and enough of the other required materials. The table compares only your Calibrator stock; targeted tuning still uses Hi-Fi Master Copies, and other required resources are separate.
| Plan for one new disc | Calibrators used directly | Calibrators converted into Cores | Calibrators left |
|---|---|---|---|
| Select the main stat only | 1 | 0 | 4 |
| Select the main stat and one substat | 1 | 2, producing 1 Core | 2 |
| Select the main stat and two substats | 1 | 4, producing 2 Cores | 0 |
The deepest option spends the entire five-Calibrator stock on one disc’s selected properties. The main-stat-only option leaves four direct main-stat selections available for later discs, assuming you also have their other materials.
That can matter more than fine-tuning a single piece when two Agents still have unsuitable main stats. Conversely, a player with complete, functional sets may reasonably spend more on a difficult final replacement. The resource decision should follow the account’s remaining equipment gaps, not the appeal of filling every targeting option.
Cores you already own are a separate stock. Do not pretend every Core in your inventory cost you two Calibrators, but do account for that conversion when deciding whether to make additional ones.
Before confirming an expensive tune
- Write the intended six-slot set layout and count the resulting effects.
- Identify the exact equipped piece the new disc would replace.
- Choose an allowed main stat for that partition that serves your build.
- Decide whether you need substat targeting now or whether a main-stat fix is enough.
- Recount the materials consumed by the whole selection, including Master Copies and any Core conversion.
Finally, keep the target modest enough to be useful. A completed, coherent layout is a different milestone from a fully optimized collection. Once the intended set effects and necessary main stats are in place, further tuning should compete with the other improvements your teams still need—not happen automatically because a stronger disc is theoretically possible.
Latest comments
Log in to join the conversation
Log InNo comments yet. Be the first to share your thoughts!