
A strong weapon can make a room look manageable right up to the moment an attack reaches your back. If your Tallowmere 2 runs keep ending while you are trying to block, start with the position you chose before the hit: which way were you facing, what was behind you, and were you carrying a key?
The useful habit is to face the immediate threat, block, then choose a short opening to act. That opening might be an attack, a turn, or a retreat. Holding the shield and hoping the whole room becomes safe leaves too many things unchecked.
This guide focuses on the standard dungeon on iOS and Android. The room example is a schematic: adapt the sequence to the enemies and terrain you actually encounter.
1. Make the shield easy to reach before changing your build
On touchscreen, movement is on the left; attack, jump, shield, and interaction controls are on the right. The buttons can be repositioned. Move the shield control somewhere you can reach reliably without confusing it with attack or jump. Controller buttons can also be remapped. The developer’s controls page explains the supported input arrangements.
Controls page
Open official referenceIn a clear space, rehearse three separate actions:
- Face the direction you intend to defend.
- Raise the shield and check your character’s facing.
- Practice changing direction and establishing your guard again.
Keep that sequence deliberate. The game does not automatically turn your guard toward every incoming attack. If you are being pressured from both sides, a shield pointed toward one opponent does not solve the other opponent’s position.
During your next fight, watch for the first moment you become surrounded. That is the decision to improve. Waiting until the screen is crowded and then repeatedly toggling the shield makes it harder to tell what went wrong.
2. Solve the position before chasing damage
Consider an illustrative room with an archer to your left, another enemy to your right, and a trap along the floor. You stand between the enemies, facing right. Even if your guard handles the right-hand threat, you have left the archer’s side exposed.
Trying to finish the right-hand enemy faster may work, but it commits you to a damage race. A more cautious plan is to look for a position where the immediate threats are on the same side. Only move there if the route and landing space are clear. A jump that avoids an arrow but lands on a trap has not solved the room.
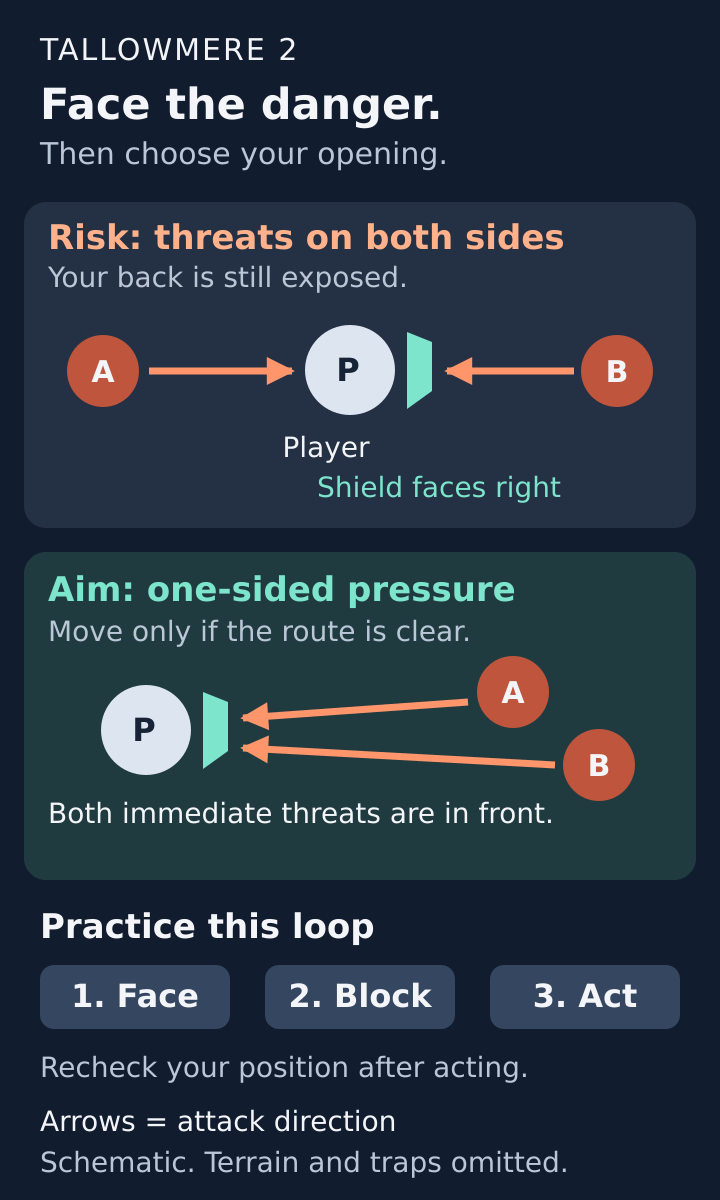
Two schematic combat positions: a player facing right is exposed to a threat behind them; a second position puts both immediate threats in front of the shield. A three-step loop shows face, block, then act. Original teaching diagram, not a screenshot or a guaranteed dungeon layout. Arrows show attack direction; the diagram omits terrain and traps.
Once you have a better position, wait for a manageable opening, lower the shield, make a brief attack, and reassess. Choose the length of that opening from the attacks you can actually see. There is no universal safe number of swings for every weapon and enemy combination.
If another enemy moves behind you, stop treating the situation as the same fight. Check your escape space, change facing when you have room, and establish your guard again.
3. Treat carrying the key as a separate dangerous trip
The key opens the exit, but getting it to the door is another task. A room can be quiet enough to loot and still have a dangerous trap crossing.
Raising your shield drops the key. A forced block therefore interrupts the carrying trip. Before picking it up, inspect the route to the exit. Deal with enemies that would force you to fight while transporting it, identify narrow passages, and check where you could stop safely.
Separate two questions: can you manage the enemies, and can you carry the key through the terrain? Removing the enemies answers only the first. If you need to put the key down to guard, plan where you will retrieve it rather than rushing into the next hazard.
For difficult crossings, preserve health and consider the whole route before committing. Picking up the key as soon as it drops is optional; choosing a safer moment can make the rest of the room easier to read.
4. Do not interpret every colored screen as a failed block
The official status guide distinguishes three warnings:
Official status guide
Open official reference- Red: low health. Prioritize reaching a position where you can recover.
- Purple: stunned. Being incapacitated explains why a planned response may not happen.
- Green: poisoned. Recognize the status instead of assuming every change in health came from a new visible hit.
After a bad exchange, ask what happened first. Were you hit from behind and then stunned? Did you enter a trap while trying to escape? Did you already have poison when you started the next fight?
The order matters because each mistake needs a different correction. More frantic shield inputs will not teach you whether the original problem was positioning, a status effect, or an unsafe route.
For ordinary recovery, the mobile game documents health potions, dropped hearts, and healing from Lady Tallowmere. Use the recovery options you can safely reach rather than taking an optional fight while badly hurt. Do not assume that every potion cures every status.
5. Turn safe clears into a stronger next room
Survival still needs progression. Slain enemies leave souls; enough souls form a Soul Group, which you exchange at a Demon Statue for a reward such as Attack Power or Max Health. The developer’s dungeon guide explains this progression and the need to keep finding useful equipment as enemies become tougher.
Developer’s dungeon guide
Open official referenceIf you are repeatedly surviving fights with very little health, consider a health reward when offered. If each enemy takes so long to defeat that more threats gather around you, consider improving your damage. Those are practical ways to choose between the rewards in front of you, not a fixed upgrade order.
Check that useful loot is actually equipped. Since version 0.3.7d, Auto-equip Loot has been disabled by default, with manual equipment changes available through Quick Swap, the Weapon Selector, or Inventory. Finding an upgrade and using it are separate steps. Compare equipment in a cleared area, then return to the next fight with a known setup.
6. Practice the sequence without risking every lesson
If permadeath is making it hard to learn the controls, use a separate practice run. The home room’s Difficulty Panel offers Cuddly, which provides extra health and respawning. Its costs are explicit: achievements and leaderboards are disabled, and the run is limited to 60 rooms. Feral is the regular permadeath difficulty. These rules are documented in the 0.4 update notes.
0.4 update notes
Open official referenceFor the standard dungeon, use the home room door rather than the Game Mode portal. Give the practice run one goal: notice when a threat reaches your back and reposition before attacking again. You do not need to clear dozens of rooms to learn something useful.
After each death or close call, record one cause: wrong facing, attack committed too long, key crossing, trap position, or status effect. Change one habit for the next attempt. A shorter, understood fight is better practice than a longer run whose final seconds remain a blur.
Before your next room, check four things: shield control, facing, safe space, and health. Then earn your next attack opening rather than assuming your weapon will create one.
Latest comments
Log in to join the conversation
Log InNo comments yet. Be the first to share your thoughts!