
For a low-maintenance Greenhouse, use six Iridium Sprinklers and build toward Ancient Fruit that you harvest on a weekly routine. Starfruit is a useful alternative when you can buy seeds, want a valuable crop before Ancient Fruit matures, or already have fruit waiting for a limited number of Kegs.
The important distinction is what you are short of: growing space, seeds, time or processing capacity. A fruit that makes the most valuable bottle does not necessarily earn the most from each crop tile over time.
This guide covers the standard, unmodded Greenhouse using 1.6-era mechanics documented by the community-maintained Stardew Valley Wiki. The crop comparisons below use base prices, no professions or growth-speed bonuses, and ordinary unaged wine. They are calculations, not a claim that every farm will earn the same amount.
Set up the floor before planting permanent crops
The growing bed is 12 columns wide and 10 rows deep. Crops can grow there across seasons, but still require watering; outdoor rain does not water this indoor bed. Regrowing crops survive the season change, which makes their long-term placement worth planning.
Use the top-left crop tile as column 1, row 1. Count columns left to right and rows from the back wall toward the entrance. Place six standard Iridium Sprinklers as follows:
| Sprinkler | Column | Row | Position |
|---|---|---|---|
| A | 3 | 3 | On the growing bed |
| B | 8 | 3 | On the growing bed |
| C | 13 | 3 | On the wooden border immediately right of the bed |
| D | 3 | 8 | On the growing bed |
| E | 8 | 8 | On the growing bed |
| F | 13 | 8 | On the wooden border immediately right of the bed |
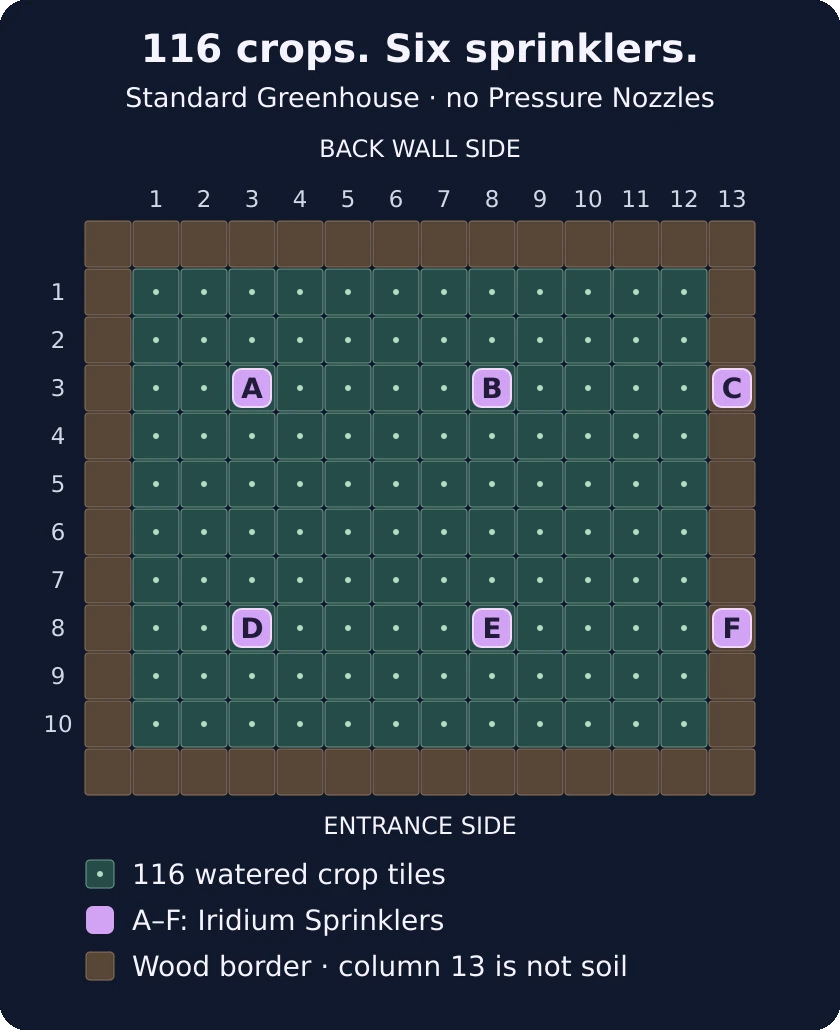
Six standard Iridium Sprinklers cover 116 crop tiles. Sprinklers C and F sit on the right wooden border, outside the 12-column bed; no Pressure Nozzles are used.
Column 13 is outside the 12-column soil rectangle. The right-hand border positions are intentional; do not move those two sprinklers onto column 12 just to keep every sprinkler on soil.
An Iridium Sprinkler reaches two tiles in each direction, covering a five-by-five square around it except its own tile. The first two blocks of crop columns covered by this layout are 1–5 and 6–10; the border sprinklers cover the remaining crop columns 11–12. Rows 1–5 and 6–10 are covered in the same way.
Only the four sprinklers on soil consume crop spaces: 120 − 4 = 116 plantable tiles. This layout is for standard Iridium Sprinklers without Pressure Nozzles. It does not require trellis crops, machines or decorative paths inside the bed.
Water newly planted crops yourself if they need it on setup day. Placing the watering system is preparation for its normal daily cycle, not a reason to leave the first day's seeds dry.
Should you wait for better watering equipment?
A Quality Sprinkler layout can leave 108 crop spaces. Upgrading from 108 to 116 gains eight plants, about 7.4% more growing capacity. That is worthwhile, but it is not a reason to leave the whole Greenhouse unused while you collect Iridium.
Start producing with the equipment you have. Avoid placing a long-lived crop on the exact four soil positions reserved for your eventual Iridium layout, or accept that you will need to remove those plants later. Temporary crops can occupy the other spaces during the transition.
Deluxe Retaining Soil is a later alternative: after watering, its 100% overnight retention can eliminate sprinklers and free the whole bed. Moving from 116 to 120 crops adds four plants, about 3.4%. Decide whether that small space gain is worth changing your established setup rather than assuming the mathematically fullest layout must be your next priority.
Ancient Fruit or Starfruit? Compare the full growing cycle
Ancient Fruit takes 28 days for its first harvest, then regrows every seven days. Starfruit takes 13 days and needs another seed for the next crop. Starfruit Seeds cost 400g at the Oasis.
| Baseline comparison | Ancient Fruit | Starfruit |
|---|---|---|
| Initial growth | 28 days | 13 days |
| Continuing harvest cycle | 7 days after maturity | 13 days after replanting |
| Regular raw fruit value | 550g | 750g |
| Ordinary wine value | 1,650g | 2,250g |
| Replanting cost used below | None for an established plant | 400g per crop |
The higher Starfruit bottle price answers one question: which of those two bottles sells for more? It does not include the longer crop cycle or repeated seed purchase.
For an established Ancient Fruit plant, one harvest turned into ordinary wine represents 1,650 ÷ 7 ≈ 235.7g per crop tile per growth day. For repeatedly replanted Starfruit, subtract the seed: (2,250 − 400) ÷ 13 ≈ 142.3g per crop tile per growth day.
These are steady-state crop comparisons with enough Keg capacity. They exclude Ancient Fruit's initial 28-day wait, the cost of establishing its seed stock, equipment costs and delays between harvesting, processing and selling. They also do not add the Keg timer to every crop cycle: after production is running, the next crop can grow while the previous harvest is being processed elsewhere.
If you sell the same regular-quality fruit raw instead, the comparable ongoing figures are 550 ÷ 7 ≈ 78.6g for Ancient Fruit and (750 − 400) ÷ 13 ≈ 26.9g for Starfruit. Higher-quality harvests and professions change those sale figures, so keep them out of this baseline rather than mixing boosted and unboosted prices.
The practical conclusion is to favor established Ancient Fruit for this two-crop, no-speed-bonus comparison. Starfruit remains useful during setup and under different processing constraints; this is not a claim that Ancient Fruit beats every possible crop, fertilizer or playstyle.
When Kegs are scarce, compare the value they add
Wine uses a fruit's base value, not the quality premium of the harvested fruit. With a limited number of Kegs, consider what you gain by processing rather than selling the input now.
Suppose you already have one regular Starfruit and one regular Ancient Fruit, but only one free Keg:
- Starfruit: 2,250g wine minus 750g raw sale = 1,500g added by processing.
- Ancient Fruit: 1,650g wine minus 550g raw sale = 1,100g added by processing.
Under those assumptions, processing the Starfruit first adds 400g more to this Keg cycle. The existing fruits are already in storage, so their seed costs are past expenditure for this immediate choice. That is different from deciding what to plant for the next several seasons.
Use lower-quality fruit for processing before higher-quality copies of the same fruit when your goal is sale income. Both become the same ordinary wine, but selling the better fruit raw preserves its quality premium. Set aside any quality-specific quest or bundle items before following that rule.
A full Greenhouse can outrun a small winery
An established 116-plant Ancient Fruit bed supplies 116 fruit each weekly harvest. If your routine is to load 40 Kegs once per weekly harvest, you use only 40 of those fruit per cycle. After three such harvest-and-load sessions, you have collected 348 fruit and loaded 120, leaving 228 fruit unprocessed unless you sold or used some elsewhere.
That is a production-plan calculation, not a claim that wine takes exactly seven 24-hour days. Wine's documented processing timer is 10,000 in-game minutes; a weekly reload routine is convenient for this example.
Build more processing capacity, deliberately sell some fruit raw, or use part of the Greenhouse for other goals. Hoarding every harvest for future wine can delay money you need now. Your crop choice is only half the income plan.
Grow your Ancient Fruit supply without pretending seeds are guaranteed
You do not need 116 Ancient Seeds before using the building. Plant the seeds you have and keep the other watered spaces productive with temporary crops.
A Seed Maker usually produces one to three seeds of the input crop, but other outcomes are possible. One fruit is not a guaranteed two new plants. Plan expansion around the seeds actually produced rather than promising yourself a fixed doubling schedule.
The reinvestment choice is straightforward: fruit placed in the Seed Maker cannot also be sold or put into a Keg. During expansion, reserve enough fruit to create the next useful batch of plants; use the rest according to your cash and processing needs. Once the permanent bed is filled, there is little reason to keep converting every harvest into more seed for that same bed.
New plants also need their own initial growth period. If you turn the first harvest from one mature plant into seeds, those newly planted descendants do not start harvesting on the parent's next weekly cycle. Expect an expansion phase before the whole Greenhouse settles into mature production.
For a tidy routine, group new plantings in batches and keep a small note of the intended harvest day. You can eventually consolidate your collection into a weekly visit; there is no need to destroy productive plants merely to make every row mature at once.
Add fruit trees without blocking their growth
Fruit trees can occupy the surrounding floor rather than valuable crop-bed tiles. While a sapling is growing, keep player-placed objects out of its surrounding three-by-three area. In the Greenhouse, the fixed wall and wooden bed border are not themselves growth obstacles, but a sprinkler or machine placed next to the sapling can be.
That matters for the two border sprinklers in the layout above. If a nearby sapling cannot grow, check those player-placed objects before moving the tree. Temporarily relocating an obstructing sprinkler means you must manually water any crop tiles it no longer covers until you restore it.
After a fruit tree matures, nearby objects no longer block its fruit production. Greenhouse fruit trees produce throughout the year, but each tree holds only three fruit. Collect at least every three days to avoid missing further production; the weekly Ancient Fruit routine is not frequent enough for full tree output. You can therefore establish the trees first where practical, then settle the surrounding equipment into its permanent positions.
A sensible build order
Get the bed watered and producing first. Leave the future sprinkler positions clear, expand Ancient Fruit in affordable batches, and keep enough cash for the rest of your farm. Add Kegs in step with harvest volume instead of assuming a chest full of fruit is already wine income.
Use Starfruit when its earlier first crop, available seeds or processing value solves your current problem. Use mature Ancient Fruit when you want this guide's steady weekly crop loop. Finish with border trees and late-game space improvements once the basic growing-and-processing routine is working.
Greenhouse mechanics and layout reference
Community-maintained Stardew Valley Wiki reference.
Read the wiki referenceProcessing values and Keg priorities
Community-maintained Stardew Valley Wiki reference.
Read the wiki reference
Latest comments
Log in to join the conversation
Log InNo comments yet. Be the first to share your thoughts!