
An extra pawn does not always win. In a king-and-pawn ending, the important question is often whether your king can reach the squares that let the pawn advance safely. Pushing immediately can give that opportunity away; promoting automatically to a queen can even turn a winning position into stalemate.
These three training positions show how to make those decisions. Use them in standalone practice or after a game, not as outside assistance during an ongoing game against another player. Each position has only the pieces shown, and the side to move is part of the exercise.
Read the position before choosing a move
A king cannot move into an attacked square. In particular, the kings cannot stand next to each other. That restriction lets one king deny the other access to important squares without capturing anything.
When the kings face each other on the same rank or file with one square between them, the player who does not have to move has direct opposition. The player to move may have to step aside. Opposition is useful because of the access it creates or prevents—not because merely arranging the kings that way ends the game.
In the notation below, K means king. Ke5 means move the king to e5; e5 without a K means move a pawn to e5. An equals sign marks promotion, + marks check and # marks checkmate. Read a position’s side-to-move label before following its line.
Position A: the same pieces, two different results
White has a king on e5 and a pawn on e4. Black’s king is on e7. The kings face each other along the e-file, with e6 between them.
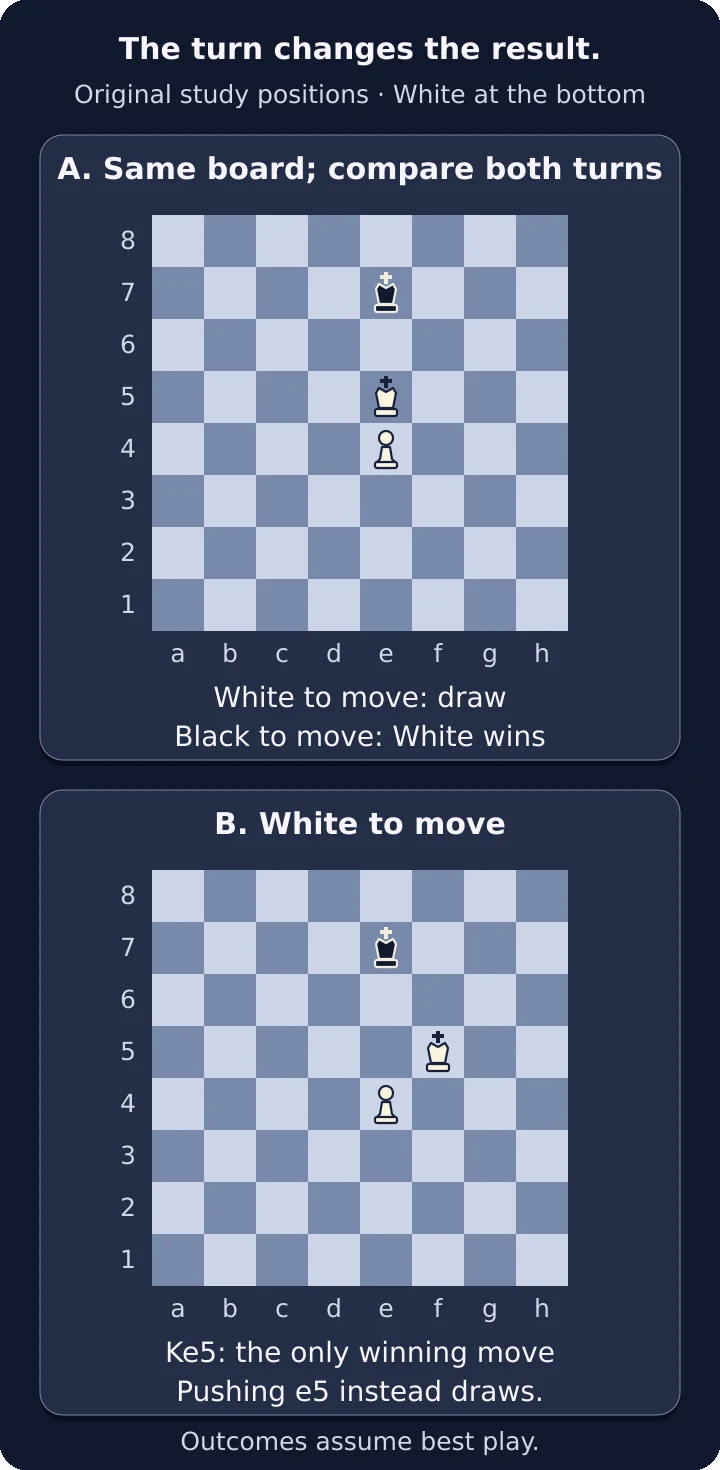
Training positions A and B: A has White king e5, pawn e4 and Black king e7; B moves the White king to f5. The side to move changes the winning plan.
| Side to move in position A | Result with best play | The immediate problem |
|---|---|---|
| White | Draw | White must move its king; its own king blocks the pawn’s advance |
| Black | White can force a win | Black must give way, allowing White’s king to enter farther forward |
Black to move: use the space the defender gives up
Start with Black to move. After ...Kd7, White should not follow behind the black king. Kf6 enters on the other side, taking the forward space that Black can no longer cover. White’s king is now helping the pawn advance instead of simply standing in its path.
Here is one legal winning continuation. It illustrates the plan; Black has other replies, so learn the purpose of each move rather than treating the line as a script.
| Step | Black’s move | White’s reply | Purpose of White’s reply |
|---|---|---|---|
| 1 | Kd7 | Kf6 | Enter on the opposite side |
| 2 | Ke8 | e5 | Advance with the king already in front |
| 3 | Kf8 | e6 | Keep the pawn supported |
| 4 | Ke8 | e7 | Reach the seventh rank under king protection |
| 5 | Kd7 | Kf7 | Protect the promotion square e8 |
The last position is White king f7, pawn e7, Black king d7, with Black to move. Black cannot capture the protected pawn or enter e8 next to White’s king. White has established a safe promotion route. The game is not already checkmate: after promotion, the remaining task is to finish the resulting winning ending.
Notice the sequence of priorities. White first improved the king, then advanced the pawn, then secured the promotion square. “Push the pawn whenever possible” would not explain why Kf6 was the important first reply.
White to move: the defender can hold
Reset the same board, but give White the move. White cannot advance e4–e5 because its king occupies e5. It must step away, and Black can respond without giving White the same forward entry.
For example, after Kd5, Black answers ...Kd7. The kings again face each other with one square between them, but now White is the player who must move. Black has restored the opposition in front of the pawn’s route.
One drawing continuation is: Kd5 Kd7, e5 Ke7, e6 Ke8, Kd6 Kd8, e7+ Ke8, Ke6. At the end, Black’s king on e8 is not in check and has no legal move. The position is stalemate, so the game is drawn.
You do not have to aim for that exact final picture to defend correctly. The lesson is to keep blocking entry and respond to the attacking king, rather than retreating automatically every time the pawn moves. Likewise, “drawn with best play” does not mean every black move draws. The defender still has to choose the right replies.
Position B: the tempting pawn push throws away the win
In position B, White’s king has moved one file to the right, to f5. The pawn is still on e4 and Black’s king is still on e7. White is to move.
Two moves look natural: bring the king to e5, or push the pawn to e5. They do not have the same result.
| White’s first move | What changes | Result with best play |
|---|---|---|
| Ke5 | Reaches position A with Black to move | White can force a win |
| e5 | Pawn advances beside the king; Black can answer Kf7 | Draw |
Ke5 is the only winning first move in this exact position. Its value is not a material gain or a check. It hands Black the move in the unfavorable version of position A. Black must step aside before White commits the pawn’s advance.
After the immediate e5 instead, ...Kf7 is the drawing reply. Black’s king now faces White’s king on the f-file, with f6 between them and White to move. The pawn has already used the advance that White could have saved until the king gained access.
This is a concrete example of a tempo: changing whose turn it is in an important arrangement. Ke5 forces the defender to give way first. The pawn push allows the defender to establish the blocking arrangement instead.
Do not turn that into “never push a pawn in an endgame.” In position A’s winning continuation, pawn advances are essential. The decision is whether the king has already done its job. Before pushing, ask which squares your king will gain—or lose access to—after the opponent’s best reply.
Also avoid declaring the game inevitably drawn as soon as e5 appears. Black must find ...Kf7. Other replies can give White another winning chance. When reviewing your own game, separate the first lost winning opportunity from any later mistake that restores it.
Position C: a queen is not always the right promotion
White has a king on c6 and a pawn on c7. Black’s king is on a7. White is to move. The pawn can promote, but first inspect the squares Black will have afterward.
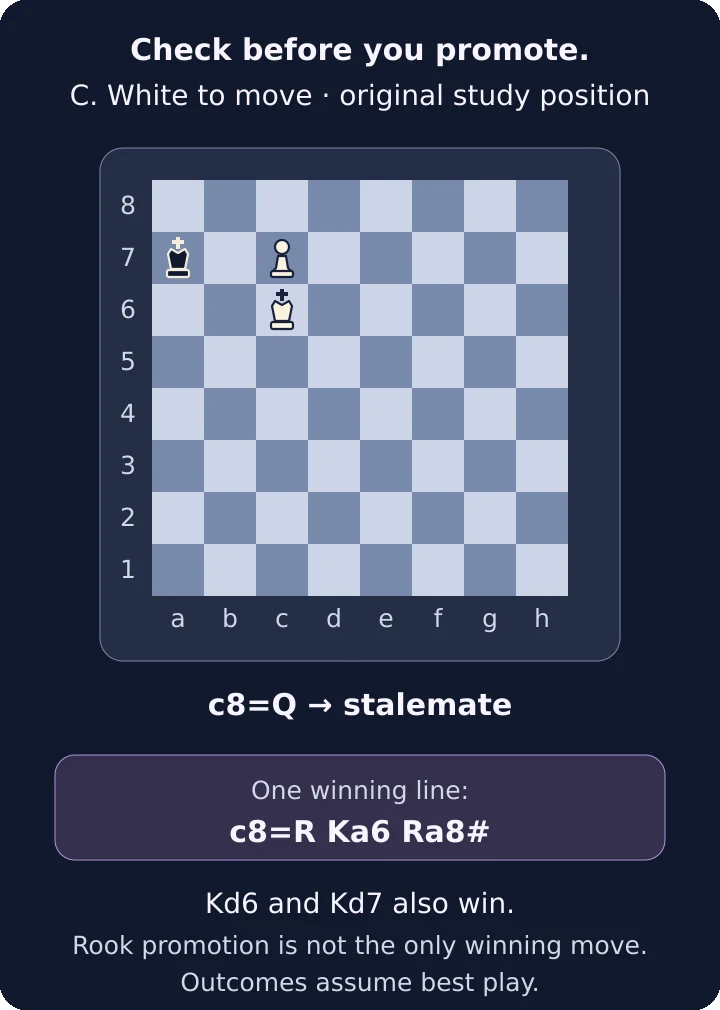
Position C, White to move: king c6 and pawn c7 face Black king a7. Queen promotion stalemates; rook promotion allows Ka6 followed by Ra8 checkmate.
A pawn reaching the last rank can become a queen, rook, bishop or knight of the same color. Here, c8=Q is legal—but it produces stalemate, not a win.
Black’s king is not in check from the queen on c8. Its possible neighboring squares are a8, b8, b7, b6 and a6. The queen covers a8 and b8 along the eighth rank and a6 along the diagonal through b7. White’s king on c6 covers b7 and b6. Black has nowhere legal to go.
That is the distinction between checkmate and stalemate: no legal move is not enough for checkmate. The king must also be in check. Without check, this position is an immediate draw.
Leave an escape square now, then deliver mate
Promoting to a rook changes the geometry. A rook on c8 still covers the eighth rank, but it does not cover a6 diagonally. Black therefore has one legal move: ...Ka6.
White can now play Ra8#. The rook checks along the a-file, covering a7 and a5 as escape squares. White’s king on c6 covers b7, b6 and b5. Black is in check and cannot escape.
| Move | Black’s situation afterward |
|---|---|
| c8=Q | No check, no legal move: stalemate |
| c8=R | One legal reply: Ka6 |
| After Ka6, Ra8# | In check with no legal reply: checkmate |
The rook promotion is not White’s only winning first move: Kd6 and Kd7 also preserve a win. It is the direct promotion choice that demonstrates the lesson. Do not memorize “underpromote near a corner”; inspect the actual attack lines and remaining legal squares.
Use a short endgame decision routine
Start with the defender’s king. Can it remain in front of the pawn, or can your king force it aside? Then inspect the turn order. If you can reach a useful opposition position, identify who will have to move next. Only then decide whether a pawn advance helps.
Near promotion, switch from thinking about distance to thinking about legal squares. Will the new piece give check? If not, does the defender have a legal move? In position C, the queen’s extra diagonal control is precisely what causes the draw.
- Confirm every piece square and the side to move.
- Choose the king square you want to reach before calculating a pawn push.
- Test the defender’s strongest reply, not only a cooperative retreat.
- Before promoting, count checks and escape squares.
- After a mistake, reassess the current position: the opponent may still allow a recovery.
Practise the decision, not just the displayed best move
Set up position A twice: once with White to move and once with Black to move. Predict the result before looking at analysis. Then try position B and explain why Ke5 changes the turn order advantage. Finally, set up position C and identify every legal black reply after each promotion choice.
Lichess’s tablebase explorer can give objective outcomes for these small endings. A winning evaluation means a win is available with correct play, not that every move wins. A drawing evaluation means the defender can hold with correct play, not that both sides can move carelessly. The worked lines here preserve the stated outcomes, but they are selected continuations rather than the only possible lines.
The important result of practice is being able to explain the next move without an arrow: “my king needs entry before I push,” “the defender must move first,” or “a queen would leave no legal reply without giving check.” Those explanations transfer to new positions more reliably than memorizing a sequence of square names.
Latest comments
Log in to join the conversation
Log InNo comments yet. Be the first to share your thoughts!