
You still own the fuel point, but your income has dropped. Sending another squad to stand beside its flag will not necessarily fix it. In Company of Heroes, a captured resource sector can stop contributing because the territory linking it to your headquarters has been lost.
Start with a simple check: can you trace an unbroken chain of controlled sectors from that resource point back to HQ? If the answer is no, your next useful capture may be behind the front line rather than farther into enemy territory.
This guide uses the US Army and Wehrmacht, the two base-game armies available on mobile, and a simplified solo Skirmish example. The British and Panzer Elite expansion factions need their own economy guidance. The instructions below explain the territory problem without assuming a particular phone layout or control scheme.
1. Separate ownership from connection
Capturing a point gives you control of its surrounding sector. Earning its resources also requires that sector to be linked to HQ through controlled territory. The original game's official manual explains this under “Resources and Population Cap” on printed page 7: disconnected resource sectors are out of supply and do not add resources.
Official manual
Open official referenceThink of these as two checks:
- Ownership: Is the resource point yours?
- Connection: Is there a continuous controlled route between its sector and HQ?
Passing the first check does not automatically pass the second. A squad may have captured a distant fuel point while leaving an intermediate sector neutral. Alternatively, an enemy may have taken a connecting sector after you established the route.
Trace sector boundaries, not the road your squad walked along. The economic connection depends on territorial control. A unit reaching a flag is not evidence that every sector between that flag and HQ belongs to you.
2. Work backward from the resource you need
Suppose a vehicle is waiting on fuel. Avoid responding by sending your nearest squad toward whichever fuel symbol looks closest. First inspect the fuel sector you already hold.
Work backward toward HQ, one adjoining sector at a time. Stop when you find a neutral or enemy-controlled gap. Then check whether a different controlled route already goes around it. A lost sector is a true cutoff for that resource only when it breaks the remaining connection.
This gives you a much more specific order than “capture more territory”: restore the missing link that reconnects this fuel sector.
It also prevents a common wasted trip. If the fuel flag remains yours, you are not trying to win the same flag again. You are trying to change the ownership of a different sector that determines whether the fuel can contribute.
The Tactical Map is useful for comparing sectors and points as a whole. Use the local battlefield view afterward to decide how safely your squad can reach the target.
3. One connecting sector can disable two resource points
Consider this deliberately simple arrangement:
- Your HQ sector connects to Link C.
- Link C connects to Fuel A and Munitions B.
- There is no second route from either resource sector to HQ.
You initially control all four sectors. Then the enemy takes Link C, while Fuel A and Munitions B remain yours.
Both resource sectors now lack a controlled route to HQ. Their flags do not need to fall for their resource contribution to stop. This does not mean your entire resource income must be zero: other connected points elsewhere can still contribute.
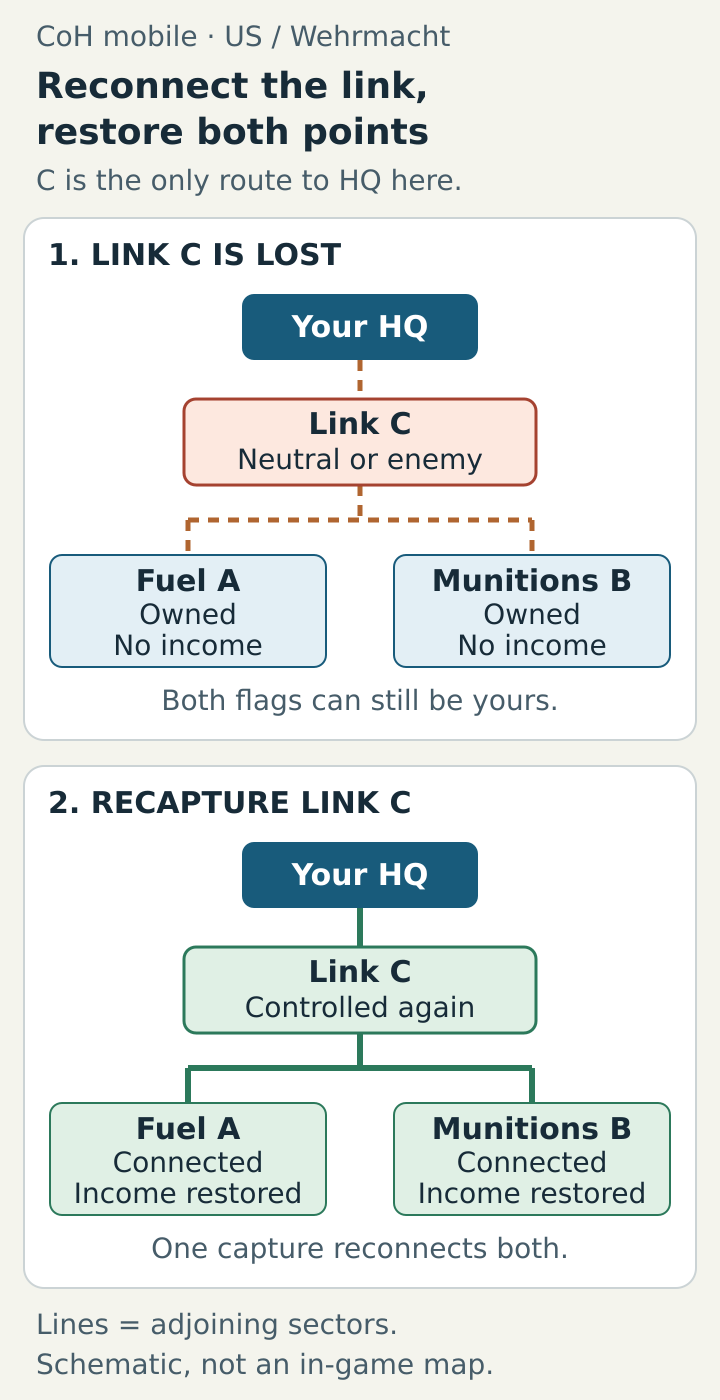
Two labeled territory diagrams show an HQ linked through sector C to Fuel A and Munitions B. When C is neutral or enemy-controlled, both owned resource sectors contribute nothing. Recapturing C restores their connection. C is their only route to HQ in this example. Original connection diagram, not an in-game map. Lines represent adjoining sectors. The example assumes Link C is the only route to HQ.
Now compare three possible orders:
- Send a squad back to Fuel A. This leaves the missing link unchanged.
- Capture another resource point beyond the isolated area. Without a route home, that expands the disconnected pocket.
- Capture Link C. This reconnects both existing resource sectors, provided the rest of the chain remains controlled.
The third order solves the illustrated problem. On a real map, a safer alternative route may be preferable, especially if the enemy has prepared a strong defense at the obvious cutoff.
4. Choose a recoverable route, not just the shortest one
Once you identify the gap, compare the cost of reopening it with the cost of building another connection through nearby sectors.
Ask three questions:
- Which route can my available force actually secure?
- How many useful sectors will reconnect when that route is complete?
- Can I hold the connection after the capturing squad leaves?
A direct attack is attractive when one manageable capture restores several points. It becomes less attractive if it repeatedly consumes squads without keeping the route open.
Do not turn the supply check into an instruction to rush a flag regardless of enemy positions. A failed attack leaves the economic problem unresolved and can make the next attempt harder. Assemble the force needed to clear and capture the link, or choose a different route if the map allows one.
Likewise, do not defend only the valuable-looking fuel point. When a plain connecting sector controls access to multiple resource sectors, protecting that link can protect more income than camping at one resource flag.
5. Verify income before making the next purchase
After reconnecting the territory, check the resource flow again. The useful result is a restored contribution from the affected sectors, not merely another flag changing color.
Keep your stored resources separate from your income. Fuel already in the bank and fuel arriving over time answer different questions. Buying something while checking the result can make the stored total harder to interpret.
For a cleaner check in a practice match, compare the fuel gained over similar no-spending intervals before and after restoring the route. Keep other resource-sector ownership unchanged during that comparison. Growth alone does not prove the isolated points reconnected: your other connected points may already have been producing fuel. Also inspect the whole route again in case a second link changed hands during the fight.
If the chain looks complete but a unit or building is still unavailable, read its remaining requirements. Fixing territory income does not establish that every purchase requirement has been met. Do not keep capturing unrelated flags simply because one production option is still unavailable.
6. Upgrade a working connection
For the base armies, Observation Posts can secure resource points and increase their output. The official manual covers this on printed page 8. Those benefits do not replace the need for a territorial connection.
Before investing in a resource point, inspect the route supporting it. If one exposed sector keeps disconnecting the whole area, stabilizing that sector may be the more useful first job.
Compare two questions rather than treating every upgrade as automatic:
- Will this investment improve income from a route I can keep open?
- Would the resources help me recover or defend the connection more effectively elsewhere?
There is no universal answer independent of the battle. The important habit is checking whether the resource sector is connected before judging how much extra value to invest in it.
7. Practice the check on mobile
Feral recommends starting with New Game → Training. For a focused exercise afterward, set up an Offline Skirmish with the US Army or Wehrmacht against an Easy AI and choose Standard starting resources. The available options are documented in Feral's mobile FAQ.
Feral's mobile FAQ
Open official referenceDuring the match, choose one resource sector and identify its complete connection to HQ. Name the sector whose loss would break that route. After each capture or loss nearby, check the route again rather than counting how many flags you own overall.
If issuing capture orders is the unfamiliar part, Feral also provides an official iPad capture tutorial. Its demonstration is an older iPad presentation, so use your current in-game training for the controls on your device.
IPad capture tutorial
Open official referenceYour repeatable check is short: find the resource, trace the connection, secure the gap, then verify the income. More territory helps most when the territory you already fought for remains connected.
Latest comments
Log in to join the conversation
Log InNo comments yet. Be the first to share your thoughts!