Moving a Joker can change a hand from a losing score to a winning one without spending anything. But “put ×Mult on the right” is only a starting rule. It works when the effects resolve at the same stage; it cannot make a late Joker bonus happen before a Steel card held in your hand.
The useful question is: what number exists when this effect triggers? This guide answers it with worked examples, then uses the same arithmetic to compare a new Joker or a Blueprint target. Examples use unmodded scoring and the stated card effects, with no debuffs, unusual challenge rules or additional bonuses unless specified. Plasma Deck's balancing is outside the examples.
Keep Chips and Mult separate until the end
The score comes from final Chips multiplied by final Mult. A +Chips effect changes the blue total. A +Mult effect adds to the red total. A ×Mult effect multiplies the red total that exists at that moment.
For example, 100 Chips and 8 Mult give 800 points. Adding 50 Chips produces 150 × 8 = 1,200. Adding 10 Mult instead produces 100 × 18 = 1,800. Applying ×1.5 Mult instead produces 100 × 12 = 1,200.
Those are three alternative additions to the same starting position, not three effects applied together. The larger printed number is not automatically the better upgrade: +50 Chips loses to +10 Mult in this particular position.
Also distinguish a hand's base value from its finished value. A level-1 Pair starts at 10 Chips and 2 Mult. Playing two ordinary tens adds 20 Chips, producing 30 × 2 = 60 before other effects. The base 10 × 2 shown for Pair is not the final score of those cards.
Sort effects by when they happen
For the interactions in this guide, use this simplified sequence:
| Stage | What to account for | Arrangement that can matter |
|---|---|---|
| Starting hand | The hand type and its current level establish base Chips and Mult | Choose the hand you are actually playing, not the hand you hoped to make |
| Scoring played cards | Cards resolve left to right, with their effects and relevant on-scored Jokers | Arrange scoring cards; order Jokers that respond to the same card |
| Cards held in hand | Held-card effects resolve after played-card scoring | Arrange retained cards when their effects interact |
| Later Joker scoring | Independent Joker effects and Joker editions resolve in Joker-row order | Put useful additions ahead of multipliers where their timing allows it |
| Result | Multiply the resulting Chips and Mult | Compare the result with the remaining Blind requirement |
This is not a complete catalogue of every special trigger. It is enough to avoid the central mistake: treating all Joker text as if it fires only when the game reaches the Joker row at the end.
An on-scored effect such as Photograph acts during card scoring. The ordinary Joker's +4 Mult comes later. Dragging the ordinary Joker to the far left does not move its bonus into Photograph's earlier stage.
Worked hand: a Pair, Sly Joker, Joker and Blackboard
Play two ordinary tens as a level-1 Pair. Keep only ordinary Spades and Clubs in hand, so Blackboard's ×3 condition is satisfied. Use base-edition Jokers with no other effects:
- Sly Joker adds 50 Chips because the hand contains a Pair.
- The ordinary Joker adds 4 Mult.
- Blackboard multiplies Mult by 3.
Starting from the two tens' 30 Chips and 2 Mult, compare these arrangements:
| Joker order, left to right | Final Chips | Mult calculation | Final score |
|---|---|---|---|
| Sly Joker → Joker → Blackboard | 80 | (2 + 4) × 3 = 18 | 1,440 |
| Sly Joker → Blackboard → Joker | 80 | 2 × 3 + 4 = 10 | 800 |
| Joker → Blackboard → Sly Joker | 80 | (2 + 4) × 3 = 18 | 1,440 |
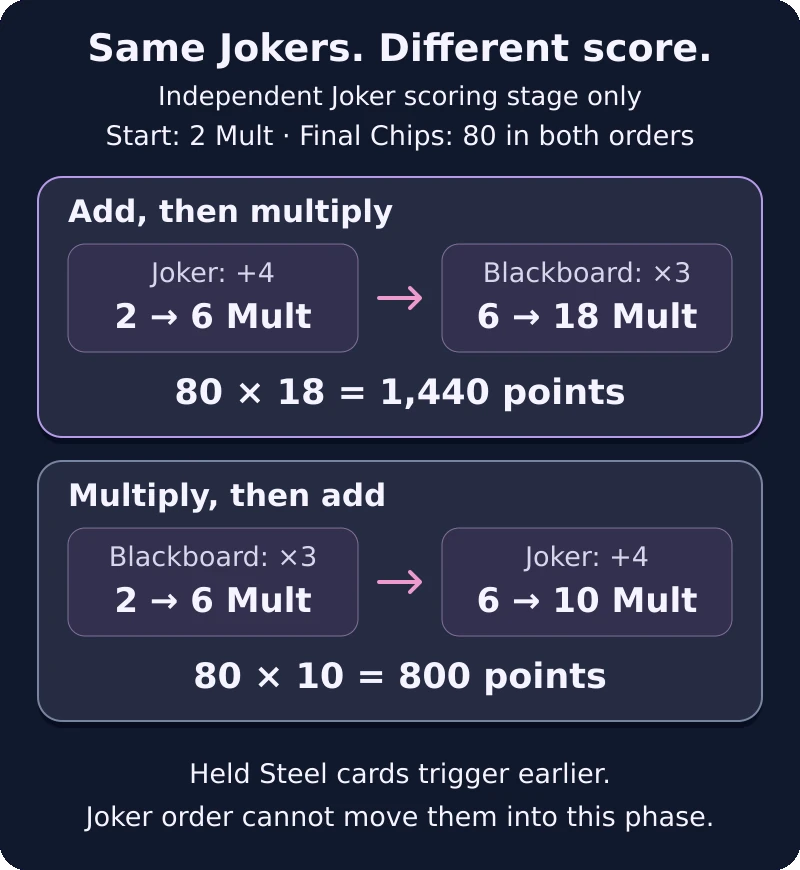
With 80 Chips and 2 starting Mult, Joker’s +4 before Blackboard’s ×3 scores 1,440; reversing them scores 800. Both active base-edition effects resolve in the independent Joker phase; held Steel resolves earlier.
The first and third arrangements tie. Moving a plain chip-only effect to the right does not prevent its Chips from contributing to the final multiplication. The important change here is whether the +4 Mult happens before or after ×3.
The good order gains 640 points over the bad one, an 80% increase from 800. It has not made any card stronger; it has allowed the same multiplier to act on more Mult.
Conditions still come first. If a normal Heart or Diamond remains in hand, this example no longer has its assumed Blackboard payoff. Rearranging Jokers cannot compensate for a condition the played hand fails to satisfy.
A multiplier cannot reach backward through scoring
Steel cards provide ×1.5 Mult while held in hand. They trigger before independent Joker bonuses. Suppose you reach the held-card stage with 4 Mult, have one active Steel card, and will receive +20 Mult from a later independent Joker. With no other effects, the result is:
4 × 1.5 + 20 = 26 Mult.
It is not (4 + 20) × 1.5 = 36. Moving the +20 Joker to a different slot cannot change that phase boundary.
This explains why adding a Steel card can feel underwhelming in a build that gets almost all its Mult from late flat bonuses. In this example, the Steel card adds only 2 to the final Mult: without it, the total would be 24.
Now increase the Mult entering the held-card stage from 4 to 20, keeping the same Steel and later +20. The result becomes 20 × 1.5 + 20 = 50 instead of 40 without Steel. The card adds 10 this time. Its printed multiplier is unchanged; the amount available to multiply is larger.
The practical decision is to support the stage your multiplier uses. Earlier Mult from a stronger hand base or compatible scored-card effects can feed a held-card multiplier. Another late additive Joker may raise the final score, but it does not retroactively strengthen that Steel trigger.
Photograph and Smiley Face: order inside one card's scoring
Smiley Face adds 5 Mult when a face card scores. Photograph gives ×2 Mult on the first played face card that scores. Because both can respond to the same card, their relative order matters during that card's scoring.
Isolate that interaction with 4 Mult immediately before the first scoring face card's Joker effects. Assume no other Mult effects on the card:
| Order | Calculation | Mult after this interaction |
|---|---|---|
| Smiley Face before Photograph | (4 + 5) × 2 | 18 |
| Photograph before Smiley Face | 4 × 2 + 5 | 13 |
These are intermediate Mult totals, not complete hand scores. Later scoring cards or Jokers may still add or multiply more. The example isolates why putting Smiley Face first helps when both affect the same card.
Retriggers repeat the interaction
Hanging Chad retriggers the first scoring card two additional times. If that first scoring card is also Photograph's first face card, it scores three times in total. With the same starting 4 Mult, Smiley Face and Photograph produce:
| Pass of that face card | Smiley Face → Photograph | Photograph → Smiley Face |
|---|---|---|
| Original score | (4 + 5) × 2 = 18 | 4 × 2 + 5 = 13 |
| First retrigger | (18 + 5) × 2 = 46 | 13 × 2 + 5 = 31 |
| Second retrigger | (46 + 5) × 2 = 102 | 31 × 2 + 5 = 67 |
The difference grows from 5 Mult after the first pass to 35 after the third. Retriggering is not merely adding another copy of the first pass's final score; each pass operates on the running total left by the previous one.
The card position is essential. If an ordinary numbered card is the first scoring card and a face card comes later, Hanging Chad repeats the numbered card instead. Keep the intended face first among the cards that actually score. A face card played as an unscored extra does not qualify merely because it appears on the table.
Choose a new Joker by the gain it adds now
When the effects being compared occur at equivalent useful timing, a quick ratio makes shopping decisions clearer:
- Adding C Chips to an existing Chips total gives a relative gain of C divided by the existing total.
- Adding M Mult gives a relative gain of M divided by the Mult it is added to, before shared later multipliers.
- A ×K effect multiplies the affected Mult by K; ×1.5 is a 50% increase at that point.
Do not apply the flat-Mult shortcut across the Steel timing boundary above. Work through the stages when one option arrives before a multiplier and another arrives after it.
Here are two hypothetical scoring states with no additional timing complications:
| Starting totals | Add 50 Chips | Add 10 Mult | Apply ×1.5 Mult |
|---|---|---|---|
| 100 Chips × 8 Mult = 800 | 1,200: +50% | 1,800: +125% | 1,200: +50% |
| 200 Chips × 80 Mult = 16,000 | 20,000: +25% | 18,000: +12.5% | 24,000: +50% |
The same +10 Mult that wins the first comparison loses the second. This is why a useful early additive Joker can become the weakest scoring slot later. Compare its current contribution rather than its rarity or the fact that it carried your opening antes.
Reliability is part of the choice. A conditional effect that is inactive for your next hand adds nothing to that hand. Before replacing a dependable Joker, calculate the score both with and without the new condition satisfied. If the lower result loses the Blind, the replacement also demands a reliable way to meet its condition.
Blueprint: copy the best contribution, not the flashiest label
Blueprint copies the compatible Joker immediately to its right. It copies the ability, not the target's edition. A Polychrome finish on a target is therefore not an extra ×1.5 that Blueprint automatically duplicates.
For a clean example, suppose your independent scoring package starts with 10 Mult and contains a compatible +20 Mult effect followed by a compatible ×3 effect. All effects are active, all cards use base editions, and there are no other timing complications.
| Blueprint target and arrangement | Resulting Mult |
|---|---|
| Blueprint → +20 effect → ×3 effect | (10 + 20 + 20) × 3 = 150 |
| +20 effect → Blueprint → ×3 effect | (10 + 20) × 3 × 3 = 270 |
Copying ×3 is better here. That is a result of the numbers, not a rule that Blueprint must always copy ×Mult.
For a counterexample, suppose a build already finishes at 120 Chips and 45 Mult, including a compatible +100-Chip Joker and a compatible ×1.5 Joker. Copying the chip effect changes the result to 220 × 45 = 9,900. Copying ×1.5 instead gives 120 × 67.5 = 8,100. With no other interactions, the chip copy wins.
The second example begins with totals that already include both original effects. Add only the extra copied contribution; do not remove the original target or count its normal effect twice by mistake. Recalculate when the target scales or another Joker changes the balance.
Editions can turn a simple sorting rule into a calculation
A base-edition chip-only Joker can move around the basic Pair example without changing the score. A Polychrome version also has ×1.5 Mult, so its position can now matter. Likewise, Holographic adds Mult even if the Joker's own ability is something else.
Treat the edition as an additional effect at that Joker's slot, not as decorative information. When two proposed orders disagree, write down the operations in their actual sequence. Do not classify the whole card as “Chips” and ignore the multiplier printed by its edition.
Before playing a close hand
Confirm which cards score, which remain held and which conditional effects will be active. Then arrange effects within their stages: the played cards, the held cards where relevant, and the Joker row. Finally, compare the calculated score with what the Blind still needs.
For a narrow margin, calculate the dependable outcome before counting random bonuses. A hand that wins only if a chance effect triggers is a different decision from one that clears without it.
The most useful scoring improvement is often a connection rather than a new purchase: more Mult before the multiplier that uses it, the correct card in the retrigger position, or a Blueprint aimed at the contribution your current totals lack. Once those connections are right, your shop decisions become much easier to judge.
Community reference: scoring activation order
The community-maintained Balatro Wiki documents the detailed scoring sequence.
Read the community referenceCommunity reference: Blueprint compatibility
Check which effects Blueprint can copy and which remain separate.
Read the community reference
Latest comments
Log in to join the conversation
Log InNo comments yet. Be the first to share your thoughts!