A large clear feels productive, but the best move for your current problem may be a short connection directly beneath an anchor. Before tracing a line, identify what must change: a color total, an anchor’s position, or the remaining layers on a particular ice tile. Those are different jobs, even when they appear on the same board.
The practice boards below show how to compare those jobs. They are original, complete 4×4 examples, not screenshots or solutions to numbered levels. Columns run A–D from left to right and rows 1–4 from top to bottom. We count what the visible move achieves; the colors that refill the board are not supplied.
First separate a connection from a square
Ordinary connections join at least two same-colored dots horizontally or vertically. A four-dot square removes every dot of its color across the board, including dots outside the little loop. A three-dot corner is still an open connection: close the fourth side to obtain the square’s color-wide effect.
This makes a square useful for targets you cannot currently reach with one continuous line. You do not need to extend the path to every separate dot of that color. But you still need to choose a color whose removal helps the remaining objective.
Practice one: four dots can clear nine
Here is the first board. R, B, G and Y stand for red, blue, green and yellow. The ice markings will matter in the later exercise; first, compare the red-dot removals.
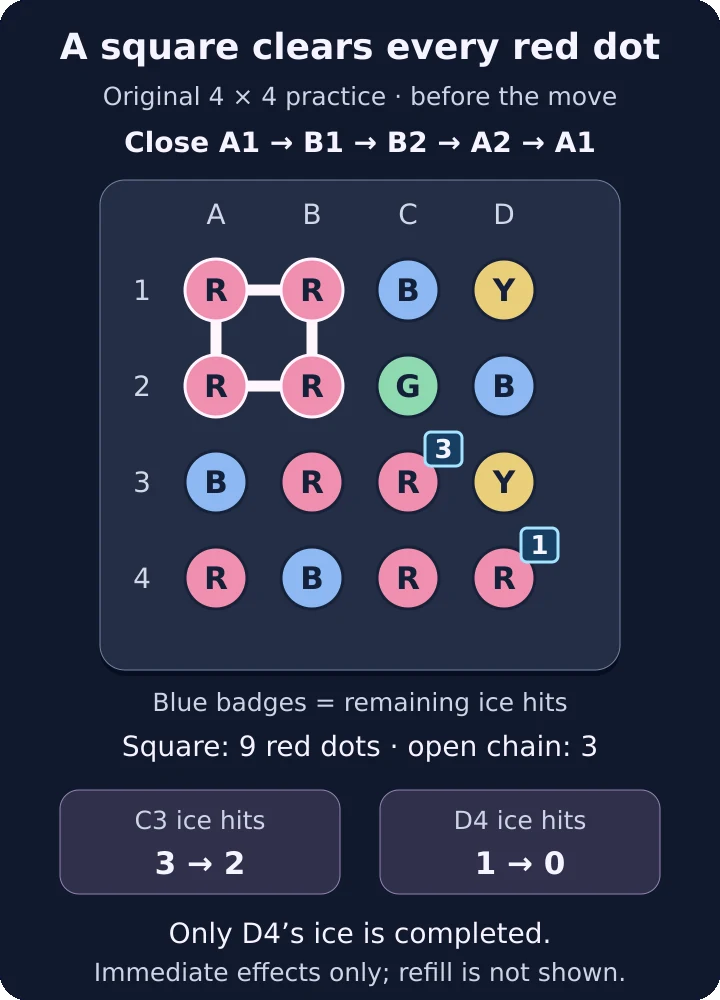
Original 4×4 practice board: close the red loop to clear nine red dots. Ice at C3 needs three hits; ice at D4 needs one.
The red loop occupies A1, B1, B2 and A2. Trace those four positions and return to A1 to close it. There are nine red dots on the board: the four in that loop, B3, C3, A4, C4 and D4. The square reaches all nine.
Now compare the open path A1 → B1 → B2. It removes three connected red dots, leaving A2 and the other five red dots outside that path. Both moves are legal, but their immediate contribution to a red collection target is different.
| Candidate move | Visible red dots removed | If nine red dots are still required |
|---|---|---|
| Open corner A1 → B1 → B2 | 3 | Six remain to be collected |
| Closed square A1 → B1 → B2 → A2 → A1 | 9 | The remaining red requirement is met |
If red collection is the only unfinished objective, that distinction can decide the level. If another objective remains, satisfying red does not finish that other job. Do not stop your calculation at “nine is more than three”; ask whether those extra removals reach something you still need.
Avoid breaking a useful loop by accident
The open corner also consumes three of the four dots that made the visible square possible. You might form another square after the board refills, but that would be a new opportunity—not the one you already had.
This is why it helps to inspect the whole small shape before releasing the connection. If a move is meant to collect red, closing the existing loop has a known advantage here. If you are deliberately choosing a different move to reach another target, make that trade consciously rather than leaving the loop open unintentionally.
The same distinction applies to preparation. Clearing something else to create a future square is a plan only when you can explain how the visible dots will line up. Hoping that replacement dots arrive in a convenient color is not the same as preserving a square that is already available.
Practice two: a short pair finishes the anchor job
Anchors count toward their goal when they drop to the bottom of the board. Clearing dots beneath them creates that descent. For this exercise, row 4 is the actual bottom edge of the complete practice board, not a cropped section of a taller level.
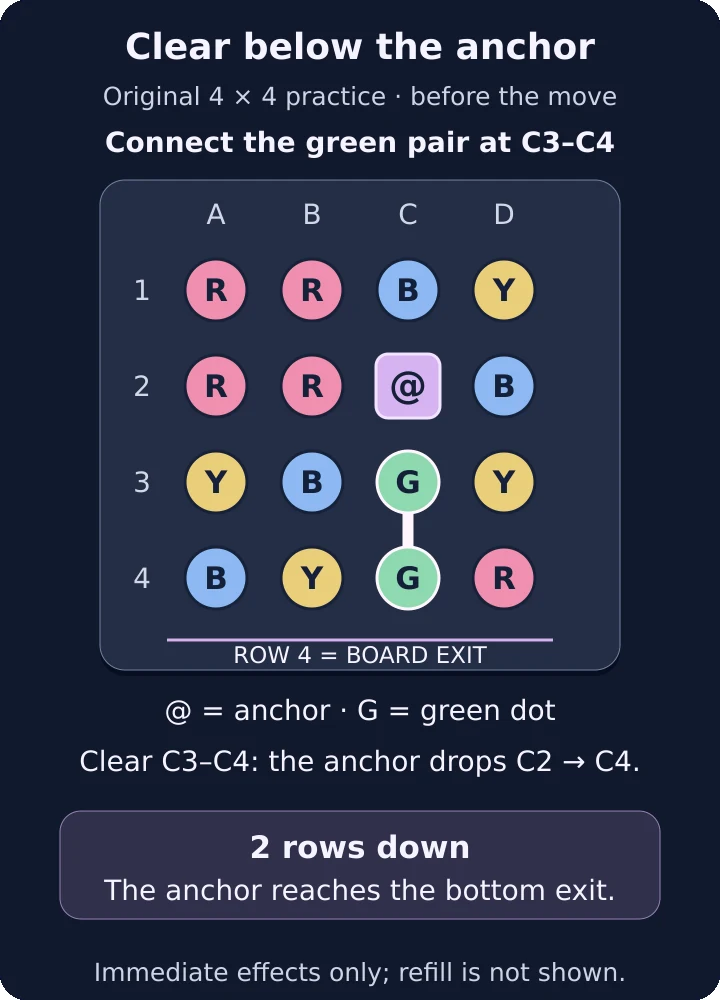
Original 4×4 practice board: connect the green pair C3–C4 to drop the anchor from C2 to the bottom at C4.
The anchor is at C2. The two cells directly below it, C3 and C4, contain green dots. They form a legal vertical pair. Connect C3 → C4 and remove them: the anchor can descend two rows to C4, reaching the bottom.
There is also a red square at the upper left. That square looks attractive, but neither of the cells beneath the anchor is red. Clearing red does not remove the two green dots blocking its immediate descent.
| Candidate move | Existing dots cleared below the anchor | Immediate anchor result |
|---|---|---|
| Green pair C3 → C4 | Both cells beneath C2 | Anchor drops to the bottom at C4 |
| Upper-left red square | None | Green dots still hold the anchor above the bottom |
If one anchor is your only remaining target and you have one move left, the green pair addresses the entire remaining job. The red square does not. This is not a general argument against squares: a square of the right color can clear cells beneath an anchor too. Here, the important information is where the removed dots are, not how impressive the overall clear looks.
Read downward from the anchor
When an anchor is stuck, inspect the cells between it and its exit. Start with the lowest obstruction and work back up to the anchor. Which visible connections remove those cells? Can one move remove several of them? Is an attractive move elsewhere actually changing that column?
Also distinguish progress from completion. On a taller board, removing two dots might lower an anchor without bringing it to the bottom. That can be useful preparation, but it is not yet a collected anchor. Judge the new position after the move before choosing the next connection.
For a level containing several anchors, examine each route separately. A move may help two anchors, help only one, or clear many dots without lowering either. You do not need a huge color clear if a small, well-placed connection completes the last required descent.
Practice three: nine red dots are not nine hits on ice
Return to the first illustration. Ice takes three hits to break, and a hit comes from removing the dot underneath it. Our example starts with fresh ice at C3, needing three hits, and already-damaged ice at D4, needing one more. Both positions contain red dots.
The red square removes those two underlying red dots along with the other reds. Each marked ice tile receives one hit. The outcome is therefore different at the two positions:
| Ice position | Hits still required before the square | Hit supplied by this removal | Hits still required afterward |
|---|---|---|---|
| C3 | 3 | 1 | 2 |
| D4 | 1 | 1 | 0: this tile is cleared |
You have cleared one ice tile, not two. The nine red dots removed across the board do not concentrate nine hits on C3. The useful unit for this objective is progress at each ice position.
This matters near the end of a level. If these are the last two ice tiles and only one move remains, the illustrated square does not finish both. It clears D4 and damages C3, which still needs further work. Recognizing that before making the move is more useful than discovering afterward that the color clear did not complete the ice objective.
Plan the next hit from the new board
Once the move resolves, examine the dot now occupying the remaining ice position. Your next opportunity depends on its color and the legal connections available around it. Do not reuse the old red route mentally: those red dots have already been removed.
A short connection through that position can be more valuable than another large clear that misses it. Conversely, a square matching its current underlying color may reach it from elsewhere. Compare those routes against the actual remaining layers, rather than continuing to chase the color that was helpful on the previous turn.
In an ice-heavy board, track the hardest unfinished position as well as the total number of tiles. Clearing several nearly broken tiles looks rewarding, but it may leave one untouched tile requiring repeated attention. A move that starts work on that difficult position can be important even if it completes fewer tiles immediately.
Put the objectives into one move comparison
When a level mixes goals, give each candidate move a small outcome record. You do not need a score formula. List which remaining requirements it advances and which it leaves unchanged.
For example, the first board’s red square could satisfy a remaining nine-red collection goal, finish the one-hit ice at D4 and reduce the three-hit ice at C3 to two. That is a strong multi-purpose move, but the correct result is still “red completed, one ice completed, one ice unfinished.” Keeping those three results separate prevents a large clear from hiding the last obstacle.
- Name the unfinished goal before choosing the path.
- Identify the exact cells or colors the move removes.
- Translate those removals into collected dots, anchor descent or individual ice hits.
- After the board settles, update the remaining job and choose from the new visible connections.
A square is a powerful tool, not a substitute for reading the objective. Use it when its color-wide reach solves the problem. Use a smaller connection when its placement does the job more directly. The move that matters is the one that changes the unfinished part of your level.
Latest comments
Log in to join the conversation
Log InNo comments yet. Be the first to share your thoughts!