
A tunnel can stop ordinary biome spread and still leave you with infected ground inside your base after the Wall of Flesh dies. That does not automatically mean you dug it too narrow. Terraria has a one-time Hardmode conversion as well as ongoing spread, and they need different responses.
The practical goal is to protect a useful area, inspect it after the world changes, and remove infection already inside it. You do not need to excavate or purify the entire world before continuing your adventure. This guide covers ordinary, unmodded 1.4.5 worlds on current Desktop, Console and Mobile versions, not special world seeds or legacy editions.
Choose what you are protecting
Start with an area you can name and inspect: your main town, a farm, or an important travel outpost. Include the ground beneath it, not just the visible buildings. Mark where you intend the protected area to end before digging.
A small boundary around something useful is easier to finish than several disconnected shafts across the map. It also gives you a clear completion test: can you follow the boundary all the way around the chosen area, and have you inspected what remains inside?
Leave practical access to chests, crafting stations and your return route. Do not demolish a working base merely to replace it with a cleaner-looking rectangle. Existing caves can form part of the separation, but examine their narrow points instead of assuming every cavern is wide enough.
Decide whether the job is containment or cleanup. Containment stops an outside source reaching the protected area through ordinary spread. Cleanup removes an existing source inside it. Doing only one job can leave the other problem untouched.
Separate three reasons infection appears
| What you observed | What to investigate first | Useful response |
|---|---|---|
| New diagonal regions appeared when Hardmode began | The initial Hardmode conversion | Inspect inside your boundary and clean affected patches. |
| Infection advanced toward the base over time | An incomplete or narrow separation | Trace the boundary, including joins and the underside. |
| A previously clear opening now contains growth | Grass, thorns or vines changed the gap | Remove the growth and prevent its source from regrowing into the opening. |
Defeating the Wall of Flesh for the first time creates two large diagonal conversion stripes in a normal world: Hallow and the world’s evil biome. This initial “V” can affect an isolated area. It is not ordinary infection creeping across the edge of your tunnel.
Count intervening tiles, not the tunnel’s appearance
Ordinary Hardmode block spread can reach susceptible tiles within a seven-by-seven square centred on a spreading tile: up to three tiles in either direction. Non-infectable material does not act as a thin shield that stops this reach. You need separation, not merely one layer of a different material.
Consider a horizontal row with infected stone at position 0. There are no other infection sources or plants in this example.
| Row | Positions between infected and pure stone | Pure stone position | Result for this source |
|---|---|---|---|
| Two intervening Wood blocks | Wood at 1 and 2 | 3 | Still within the three-tile reach. |
| Three intervening Wood blocks | Wood at 1, 2 and 3 | 4 | Outside the source’s reach. |
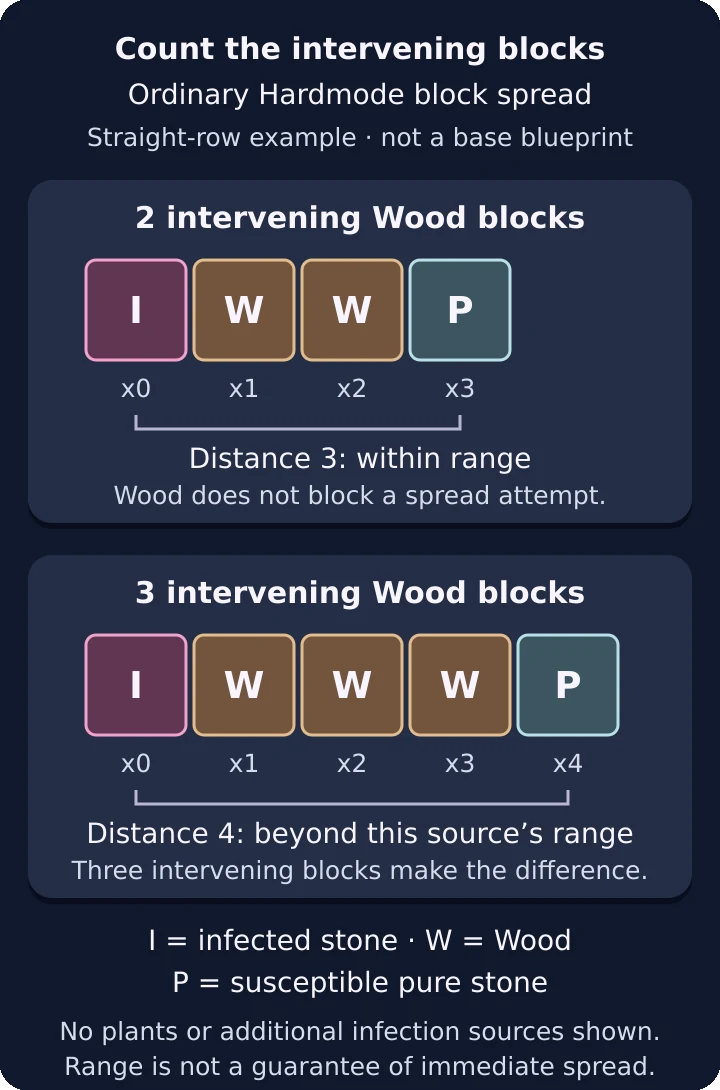
straight-row schematic of ordinary Hardmode block-to-block spread. Wood is noninfectable but does not occlude a spread attempt: pure stone at x3 is within range of infected stone at x0, while x4 is beyond that source’s range. This example assumes no plants or other infection sources. It does not model corners, routes around the gap, special seeds or the initial Hardmode conversion stripe, and is not a complete base-containment blueprint. Being in range does not guarantee immediate spread.
The second row works because the susceptible block is four positions away, not because Wood has a special shielding effect. Three intervening empty tiles give the same separation when nothing grows into them.
Treat this as a cross-section, not a complete base design. A safe-looking straight section does not prove that a corner or connection is safe. The spread area is a square, so do not measure diagonal clearance as a circular radius. Check the closest source and susceptible tiles at each bend.
Build a boundary that will stay clear
For a walkable tunnel, keep at least three intervening empty tiles between the remaining susceptible terrain on opposite sides. Then deal with grass surfaces that can produce growth. Corruption and Crimson thorns, and infectious vines, can create new spreading positions closer to the other side.
Use non-infectable foreground blocks such as Wood to cover or replace exposed grass along the relevant tunnel surfaces. Pay attention to ceilings as well as floors and the mouths of shafts. Cutting away a vine once is not the same as dealing with the grass from which it can grow again.
A useful inspection order is:
- Follow one side of the protected area from its top to its bottom.
- Continue across the bottom separation rather than ending at a convenient cave.
- Follow the opposite side back up and inspect the remaining connection.
- Examine corners, narrow cave passages and any blocks you placed as steps or bridges.
- Remove existing growth and finish the lining where grass would recreate the problem.
Do this as one connected job. If you stop halfway, mark the unfinished connection rather than treating the protected area as complete. The visible shaft beside the town may be excellent while an uncut strip below the farm still connects both sides.
Background walls are different from foreground blocks: infected background walls cannot infect foreground blocks. Hammering out every visible wall is therefore not a substitute for fixing the actual block or plant route.
Inspect again after the Wall of Flesh
Return to the area you chose to protect and look both inside and outside its boundary. If the initial stripe crossed it, widening the exterior tunnel will not remove the infection now contained within your own perimeter.
Divide the repair into two tasks. First, finish or restore the outside separation so that cleaning is not immediately undone from beyond it. Second, identify and remove the infected material inside. Work on one bounded section at a time so you know what you have checked.
A Biome Sight Potion is useful here. Its five-minute buff highlights infected tiles, with different colours for Corruption, Crimson and Hallow. One potion uses Bottled Water, Fireblossom, Blinkroot, Moonglow and five Grass Seeds at a Placed Bottle or another eligible alchemy station.
Use the buff to inspect behind the area you have just cleaned and around awkward corners. Do not spend the whole duration travelling to the site: prepare access first, then start the inspection. For a small isolated patch, removing the affected blocks can be a manageable local repair; larger areas are better suited to a cleansing tool.
Get the cleanup tool and the correct solution
The Steampunker can move into an available valid house after you defeat any one of the three mechanical bosses: The Twins, The Destroyer or Skeletron Prime. You do not have to defeat all three before working toward the Clentaminator.
She sells the Clentaminator for a base price of two platinum coins; happiness and discounts can change the shop price. The tool uses Solutions as ammunition and sprays through blocks, with a range of 60 tiles.
For removing Corruption, Crimson or Hallow, buy Green Solution. The Steampunker sells it when spoken to outside the Hallow and outside a Blood Moon or Solar Eclipse. If you find Blue Solution instead, check where you are talking to her before assuming you are missing another boss requirement.
Keep the solution’s other conversion in mind: Green Solution also changes Glowing Mushroom terrain into Jungle. If you have a mushroom area you want to preserve, plan the direction and extent of your spraying rather than sweeping indiscriminately through everything nearby.
Plan access before spraying
A long reach does not mean one standing position covers an entire region. A hypothetical infected pocket extending 80 tiles horizontally from your access shaft has a far edge beyond the Clentaminator’s 60-tile range. Spraying longer from the same location does not solve that distance problem.
Add another safe access position closer to the far edge, or approach from another side. Work in overlapping sections, then inspect the join. The aim is to cover material you could not reach from the first position, not simply use more solution on the same near edge.
You can keep this local. A side passage into one stubborn pocket may be enough; you do not have to commit to a full-world grid of shafts. Preserve useful structures and keep a route back out while opening access.
Two repair decisions that save wasted work
The top is clear, but infection returns underneath
Suppose the surface around a farm looks clean while the lower part keeps changing. Start with the underside and your cleaning access. A missed internal pocket and an unfinished lower connection call for different repairs: reach and clean the pocket in the first case; complete the separation in the second.
Do not respond by repeatedly spraying the visible surface. Find the nearest remaining source and ask whether it is inside your boundary, outside it with a route across, or beyond the reach of your previous cleaning position. That determines where the next useful work happens.
A once-empty opening now has plants in it
Suppose your straight tunnel had the intended clearance, but growth now occupies part of the opening. Restore the clear space and finish the surrounding grass treatment. Adding width only to a different, already-clear section does nothing about the changed section you are actually looking at.
After repairing the cause, clean any infection that reached the protected side. Removing the bridge does not reverse conversions that already occurred across it.
Finish with an inspection, not a purity target
For this project, success is a usable protected area with its boundary complete and its interior checked. You are not trying to make the whole world’s infection percentage disappear before fighting the next boss.
Keep the inspection route accessible. If a later building project cuts through the separation or introduces new susceptible blocks across it, inspect that alteration as part of the building work. A finished barrier remains useful only while the geometry you relied on is still there.
Latest comments
Log in to join the conversation
Log InNo comments yet. Be the first to share your thoughts!