
Winning a fight can move the insurgency rather than remove it. If your soldiers chase into the next zone while leaving their previous position open, the same group can keep escaping around your front. The solution is to plan the exits before committing the attacking unit.
This guide covers Rebel Inc. on mobile, in Main Game, using ordinary Coalition and National Soldiers. Tanks, the Billionaire's Facilitators and special campaign or scenario rules are outside this plan. Start by identifying whether your operation uses Arcade or Realistic: the same green zone does not provide the same escape protection in both.
Choose the mode for the result you want
Arcade is a separate Main Game option, not another name for Casual difficulty. Its rules prevent insurgents fleeing into stable or secured zones, make front-line infiltration harder and slow defeated insurgents' regrouping. Realistic is the original mode.
On mobile, you need to beat levels in Realistic to unlock maps and governors. Use Arcade when you want the more forgiving operation; choose Realistic when progressing those unlocks is the objective. Winning the wrong mode for that objective is not a failure of your military plan.
The Arcade escape restriction is not a promise that every stable zone is immune to every form of insurgent activity. Apply it to the specific problem it solves: where a defeated group can flee. Do not carry that protection over to Realistic simply because the map looks similar.
Separate winning the battle from closing its exits
Under ordinary rules, defeated insurgents try to escape to neighbouring zones. A soldier-held escape route needs sufficient Intel to function as a barrier. A military icon in a zone with inadequate Intel is not enough to treat that exit as sealed. HQs and Garrisons also block escape routes.
Before ordering an attack, inspect the enemy zone and each relevant neighbour. Give your units jobs rather than treating every available soldier as another unit to send forward.
| Job | What you need from the position |
|---|---|
| Attack | A unit that can win the fight in the target zone with the support available. |
| Hold an exit | A qualifying barrier in a zone the defeated group could otherwise enter. |
| Support | A nearby ordinary soldier available to assist, rather than already fighting its own battle. |
| Replace | A plan for keeping those jobs covered when a temporary unit must leave. |
A position can do more than one job. An idle soldier beside the target can support the fight while also holding an escape route. Moving that soldier into a different battle may therefore change two parts of your plan at once.
Worked example: two soldiers do not cover three jobs
Consider an illustrative pocket with three zones. Insurgents occupy A. Its only ordinary escape neighbours are B and C; there are no additional exits or special retreat rules. B and C are not stable or secured, and each currently holds a soldier with sufficient Intel.
You have contained the pocket, but neither soldier is fighting inside A yet. Now compare these choices:
| Position after the move | What happens to the escape routes? |
|---|---|
| Move B's soldier into A; leave C's soldier where it is | C remains covered, but B is now open. |
| Keep B and C covered and add an attacker in A | The attacker can fight without removing either exit barrier. |
| A Garrison covers B, while the soldiers occupy A and C | B's fixed barrier can replace the soldier's escape-blocking job. |
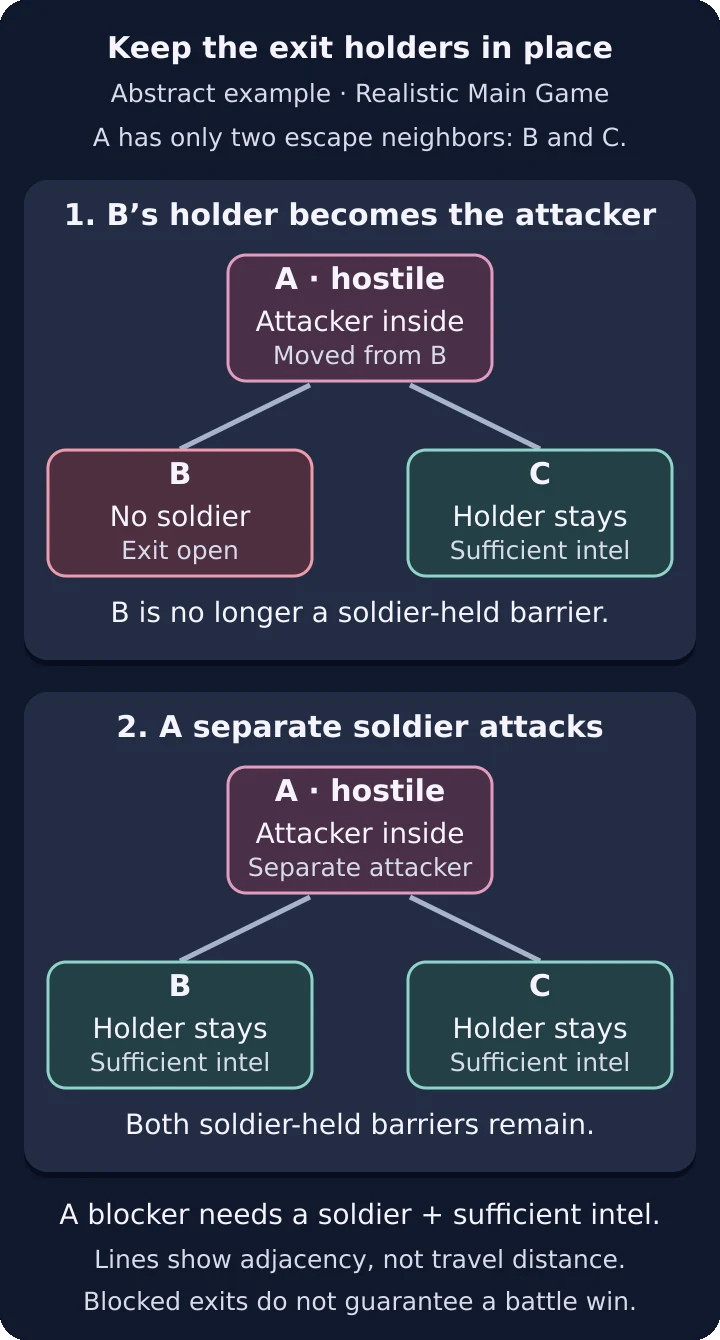
Original schematic for Realistic Main Game, with no special rules or additional exits. A’s only escape neighbors are B and C, neither stable nor secured and without a fixed escape-blocking barrier. Moving B’s holder to attack A opens B; using a separate attacker preserves both soldier-held barriers, provided the holders have sufficient intel. Blocking exits does not guarantee winning the battle. This is an adjacency example, not a literal map.
In the first line, winning the battle does not by itself finish the pocket. You created an escape route while starting the attack. If the group moves into B and you chase it again, you can recreate the same problem in reverse.
The useful question is not “can I send both soldiers toward the red area?” It is “what will still block each exit after the attacking unit moves?” With only two soldiers and no suitable fixed barrier, holding the pocket while preparing another solution may be better than repeatedly reopening it.
The second and third lines describe coverage, not guaranteed combat victories. Your attacker still needs to win, and the blocking positions still need to remain effective. If another group attacks one of those positions, reassess the whole pocket rather than continuing with the old plan.
How Arcade changes this exact example
Now change one condition: B is stable. In Arcade, the mode's fleeing restriction supplies protection for that exit even without the soldier. In Realistic, stability alone is not the substitute for the missing blocker.
This is why a manoeuvre that felt safe while learning in Arcade can fail when you switch modes for unlocks. Keep the same habit of checking each exit, but use the rules of the operation you actually started.
If nearby soldiers are not helping, inspect their task
Ordinary soldiers support nearby fights when they are not fighting themselves. A unit beside the target may look available while actually being committed to a different enemy group. Adding another attack can turn a supporting position into a separate battle instead of strengthening the original one.
First identify which unit is attacking and which is meant to support. Then inspect the neighbouring unit's current activity and the zone's Intel. Do not count a newly arrived icon as a finished, effective position before it has established the information it needs.
If the target is difficult and the fight is not progressing, there are different problems to solve:
- An unready position needs time and Intel, not an assumption that arrival completed its job.
- A supporting unit tied up in combat may need its own situation resolved before it can help again.
- An attacker that still cannot win with the available support needs a different military plan; blocked exits do not prove the attacker is strong enough to win.
Avoid responding to all three by dragging another holder forward. That can exchange a slow but contained fight for a faster fight with an open route behind it.
Plan the Coalition handover before the gap appears
Ordinary Coalition Soldiers are temporary and arrive through a faster training process. National Soldiers take longer to train and initially fight less effectively, but provide permanent forces. That makes them part of the plan before the Coalition departure becomes urgent, not merely a purchase to make afterward.
Assign the replacement a job. If the departing unit holds an exit, you need that position covered. If it is the main attacker, a weaker replacement may also need support or upgrades. Buying a green unit does not mean it has finished training, reached the front or established the position you intended.
A handover decision
Suppose a Coalition unit is holding B in the earlier pocket while another unit fights in A. Your National replacement is still being prepared. Removing the holder now would change the escape map immediately; the promise of a future replacement does not cover the interval.
Before allowing that gap, compare the practical alternatives: finish preparing the replacement, use an existing qualifying Garrison, or stop pressing the pocket while reorganising the front. If a deployment-extension choice is available, weigh its displayed cost against the actual job you are trying to preserve rather than extending every unit automatically.
The important deadline is operational: the replacement must be ready for the job when the old unit stops doing it. There is no single training or travel time that fits every governor, upgrade and position.
An emptied zone still needs civilian work
Military clearance creates room for stabilisation; it does not automatically produce it. Local support and hostility matter, and unresolved local concerns can hold a zone back. Fund the appropriate civilian response and allow it to reach the affected area rather than assuming another military purchase will satisfy a service demand.
After pushing a group out, inspect the cleared zone and the neighbouring areas you are protecting. Is the obstacle still enemy presence, or is the population waiting for a particular service? Those require different responses.
Avoid moving every soldier away merely because the fight ended. First confirm that the remaining front still covers the relevant approaches. Equally, do not keep rotating units through a quiet area without a purpose while neglecting the civilian work that would make the operation more secure.
A useful follow-up sequence is to keep the necessary boundary covered, address the zone's actual concerns, and then reconsider which units can be reassigned. That turns a temporary military success into progress toward a stable region rather than another stop in an endless chase.
Read an escape as information about the front
If a group escapes, identify the open route and correct it before launching the same attack again. The goal is not to make the map flash with constant movement. It is to leave fewer useful destinations for the enemy while preserving the support and civilian progress that let your operation finish the job.
Latest comments
Log in to join the conversation
Log InNo comments yet. Be the first to share your thoughts!