
A piece fitting somewhere does not mean it belongs there. Before placing a small block, ask what space the other visible shapes will need—and whether your move preserves that space or creates it.
The useful habit is to plan a short sequence, not hunt for one attractive placement. Sometimes a small piece must go first to clear a line. Sometimes that same small piece should stay away from the only place a larger shape can fit. The two practice positions below show the difference.
Read the board by shape, not just by empty space
Block Blast uses an 8×8 board: complete rows or columns to clear space. But ten empty cells scattered around the board do not necessarily hold a nine-cell square. A 3×3 square needs three adjacent empty cells in each of three adjacent rows, all lined up.
Look at the shapes you actually have before worrying about a hypothetical next piece. For a long horizontal bar, look for a continuous horizontal gap. For a square, look for a rectangle of empty cells. For a corner shape, check the entire footprint, including the cell where its arms meet.
A placement can fail even when most of its cells are empty. One occupied cell inside the footprint is enough. Likewise, a wide gap in one row does not help a tall piece if the rows above or below are blocked.
How to use these practice boards
These are original teaching positions, not screenshots from a played run. Columns are A–H from left to right; rows are 1–8 from top to bottom. Blue-grey filled cells are occupied; dark cells are empty. Pink outlines mark the proposed bar placement, and green outlines mark space for the square. A1–C3 means the nine-cell square covering columns A, B and C in rows 1, 2 and 3.
Each exercise gives you two shapes: a horizontal two-cell bar and a 3×3 square. Keep those orientations and place both without assists. A piece must fit entirely inside empty cells. After a placement completes a row, remove that row's occupied cells before considering the next placement; the other occupied cells stay where shown.
The exercise does not depend on a particular refill schedule, score multiplier or access to rotation or undo. Your task is simply to find a legal sequence for these pictured shapes.
Practice A: the large piece needs a setup move
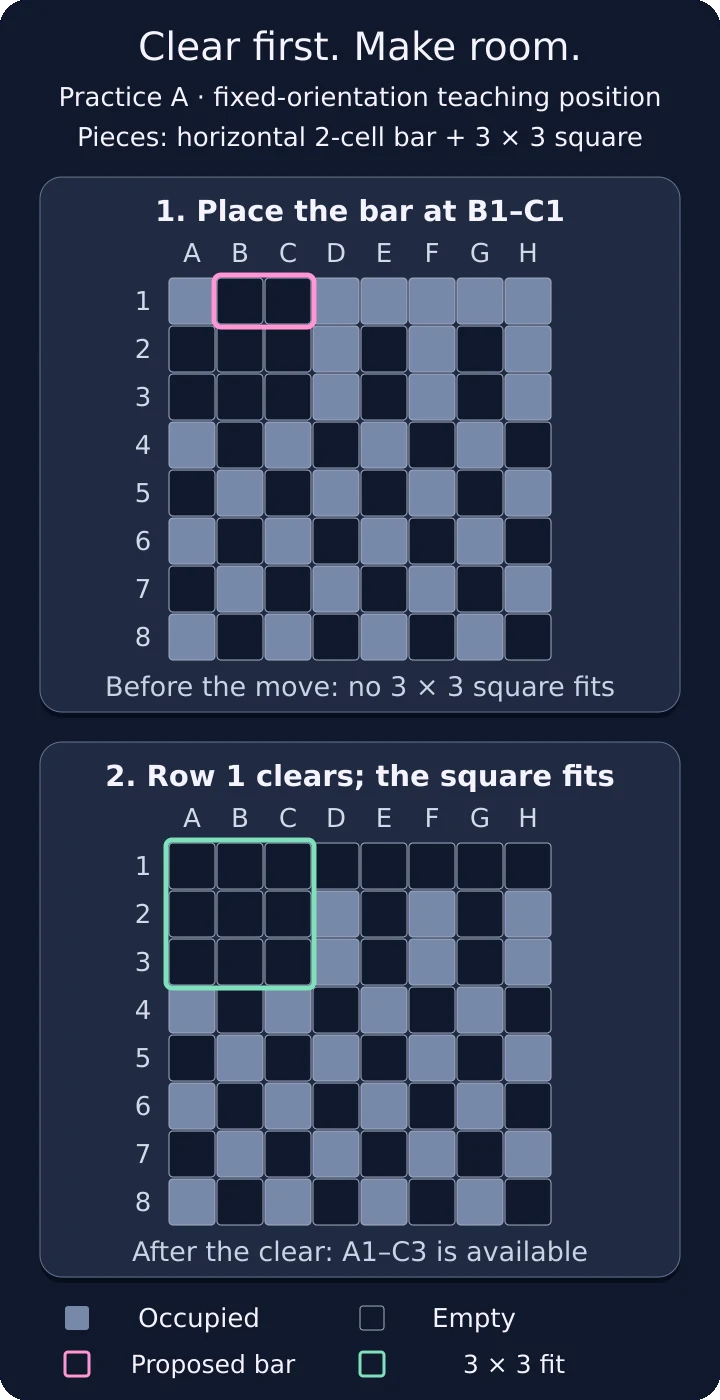
Original practice illustration. Place the horizontal bar at B1–C1, then clear row 1; the 3×3 square can now fit at A1–C3. The green outline marks a possible next placement.
Start with the first board in the illustration. The 3×3 square has no legal landing place. The six empty cells at A2–C3 look promising, but A1 is occupied. Elsewhere, the alternating occupied cells break up every possible square-sized space.
The two-cell bar fits in several places. Two tempting choices are B1–C1 and A2–B2. Only the first prepares the space you need.
| First move | Immediate result | Can the square fit next? |
|---|---|---|
| Bar at B1–C1 | Row 1 becomes complete and clears. | Yes: A1–C3 is now empty. |
| Bar at A2–B2 | No row or column clears; two cells in the open pocket become occupied. | No: there is still no empty 3×3 space. |
Play the bar at B1–C1. Row 1 already has blocks at A1 and D1–H1, so filling its two gaps completes all eight cells. Once that row clears, A1–C1 joins the open cells immediately below it. Place the square at A1–C3.
Notice what made the move useful: it opened a specific landing area for a piece already waiting. This is more precise than trying to keep the board vaguely tidy. You can point to the cells the square will occupy before committing the bar.
“Always place the biggest piece first” cannot solve this position—the square does not fit yet. A better question is: can another visible piece clear the cells that block it?
Practice B: do not spend the only landing area
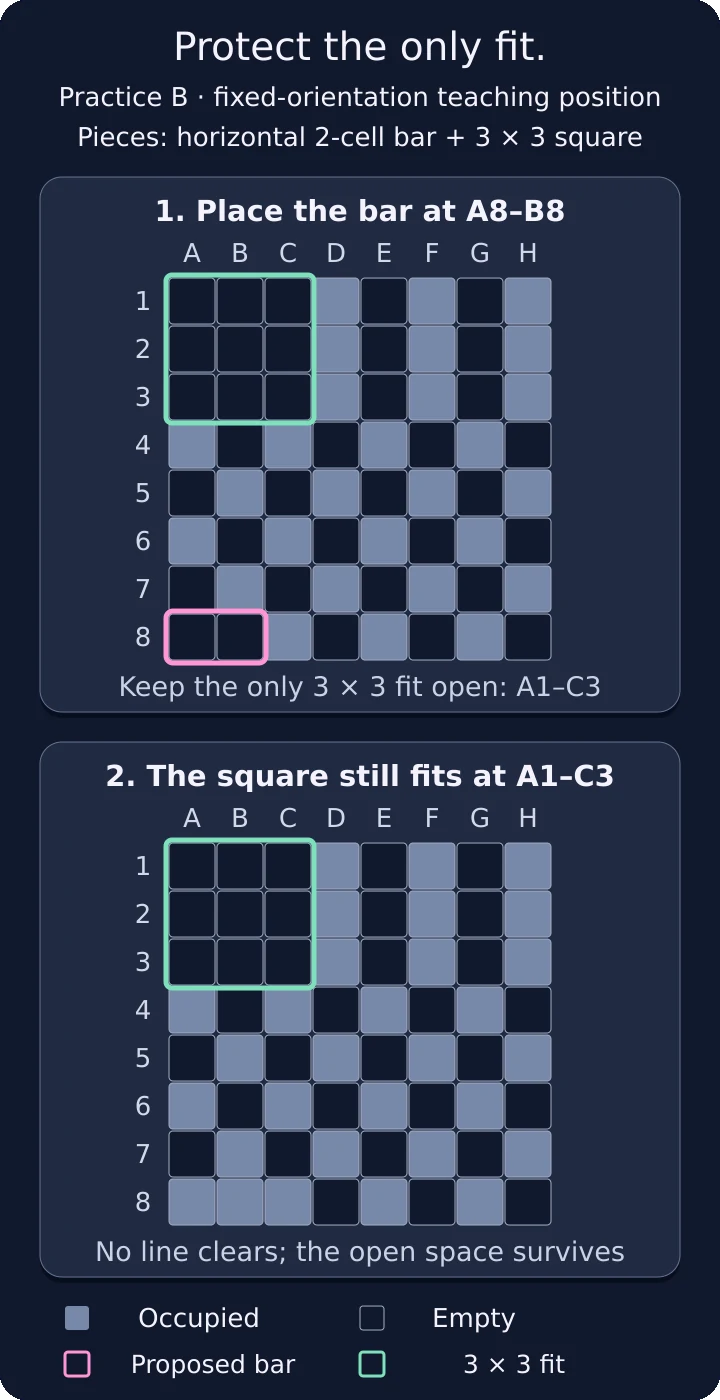
Original practice illustration. Putting the horizontal bar at A8–B8 preserves the square’s only fit, A1–C3. No line clears in this step. The lower board shows the space available before placing the square.
This board starts differently. A1–C3 is already empty, and it is the only landing area for the 3×3 square. You do not need to create a new space; you need to avoid destroying the one you have.
The small bar fits at A1–B1, inside that square-sized pocket. It also fits at A8–B8, away from the pocket. Neither bar placement clears a line, so you cannot count on an immediate clear to undo the blockage.
| First move | Immediate result | Can the square fit next? |
|---|---|---|
| Bar at A8–B8 | The lower gap is filled; A1–C3 remains untouched. | Yes: use A1–C3. |
| Bar at A1–B1 | The square's only landing area is partly filled. | No: no other 3×3 space exists. |
Put the bar at A8–B8, then place the square at A1–C3. You could also place the square first and then use the lower gap for the bar. Both sequences preserve a legal place for each piece; the point is not that one order is universally best.
A small shape often has more options than a large one, but count the options rather than assuming that. Here the square has one. Treat that pocket as reserved until you either place the square or deliberately clear another suitable area.
Turn the examples into a quick decision routine
You do not need to calculate every possible move on an ordinary turn. Start with the piece whose placement looks most constrained. Trace its footprint, then check whether your proposed first move changes it.
| What you see | What to check before committing |
|---|---|
| A visible piece has no current fit. | Can another visible piece complete a row or column that opens a fit? Work through the cleared board, not the original one. |
| A piece has only one obvious fit. | Does the small piece you are about to place occupy any of those cells? If so, look for a different placement or a sequence that creates another fit. |
| Several pieces compete for the same pocket. | Place one mentally, apply any clear, then test the next shape. Separate legal placements do not prove a legal sequence. |
| You can clear a line in two ways. | Compare the resulting empty regions and the fits they preserve for the remaining visible shapes. Do not judge only by the line that disappears. |
| Empty cells are scattered everywhere. | Check for the continuous shape you need. Total empty-cell count is not a substitute for a usable footprint. |
The important check happens after each imagined clear. A move can make an impossible placement possible, as in Practice A. A move that clears nothing can quietly eliminate your only option, as in Practice B.
Before your next move
Planning the visible pieces helps you avoid a specific, preventable mistake: using cells that another known piece needs. It does not tell you which shape will appear later or guarantee that every position has a solution.
Before your next move, ask three questions: Where can each visible shape fit? What will clear if I make this placement? After that clear, where will the remaining shape go? If you can answer all three, you have a plan rather than just an empty spot.
Latest comments
Log in to join the conversation
Log InNo comments yet. Be the first to share your thoughts!